Hello,
I thought it would be a good idea to start a new topic to post the renderings of models built in mecabricks.
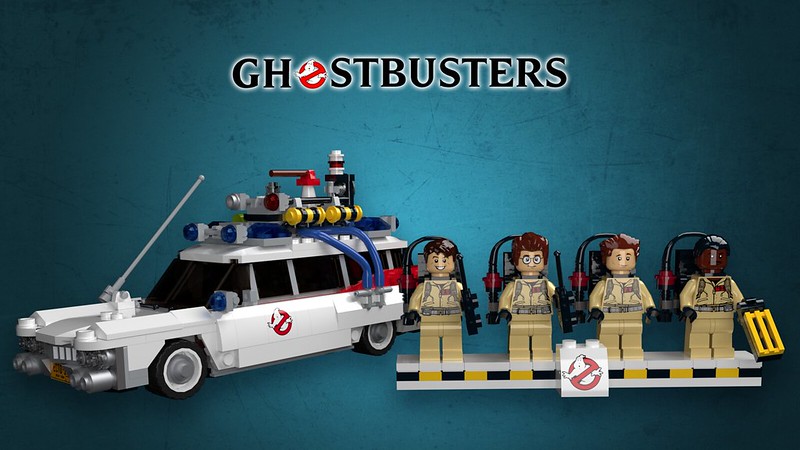
So here is my version of the Ecto-1 LEGO set:

Ghostbusters by mecabricks, on Flickr
This was the first time I used the Cycles renderer from Blender and the node editor. I really enjoyed doing it and I'm looking forward to improve my skills.
I saw this video a couple of weeks ago. We had the link in our weekly company email for CAD. It's pretty interesting.
The pro version of wlange's method would be tripod with a SLR and 8mm fisheye. This method is used for Google Indoor Maps. You usually shoot 8 pictures with a bracketing. The more steps you use the higher is the dynamic range of the image and the better is the lighting of your scene. Finally you stitch the pictures to one spherical panorama. In your scene you can use a cube with a cubic mapping to get reflections and ground shadows.
I have a D200 with 8mm fisheye here. I just need to find time and energy to make a test. I had this idea to implement LEGO models into filmed plates for ages but no motivation to start with it.
One challenge in car rigging is to simulate realistic motion blur. There's some pretty expensive software available for this, which replaces physical camera rigs, that not long ago were required to achieve this.
Creating high-end photo spheres is a time consuming process. Aside from the camera, a fast lens and a tripod it needs a gimbal. The software for stitching the shots together is pretty good, though. I had a trial of Kolor Autopano installed a while ago. I think I'll give it a try next time I'm in Vienna - even though it means, that I have to get up early enough to get the best possible lighting conditions and avoid dozens of people appearing in the shots...
Awesome again wlange!
I tried something like that some time ago, but with HDRi images.
Soon I'll try using some photos I'll take with my GoPro 😉
High-end photo spheres are worth the effort if you can afford a proper setup. I agree that you have to invest half a day into a shooting (nearby) and preparing everything (if you have experience and a routine). But to take a tripod to a place isn't a big deal and the shooting itself doesn't take long (half an hour with setting up and some back plates for your model). Compared to a quick and dirty method it makes a difference but when you take a look at your test and my test with a steel ball and iPhone you can get good results this way.
Wlange, you're a wizard too 😄
I love your Beetles!
Not really. I'm just trying to understand, how things work. And Blender is the perfect playground for this, because it's free. What you're seeing here is just a by-product.
Beetle Cabriolet

Beetle Cabriolet by
W. Lange, auf Flickr
You're right, but there is a gap between "understand how things work" and "do things well" 😛
I try to find times to play with Blender too, but it's difficult now (Thanks children 😉 )
Latest VR research. 4 of 8 spots finished. A Cardboard version will be published soon™.

LEGO® Docking Bay 327 VR by Renderbricks, auf Flickr
I updated my LDRAW setup again. I would like to see this set on MB 😃

LEGO® Technic 42054 Claas Xerion 5000 Trac VC by Renderbricks, auf Flickr
WOAH!
Happy Helloween!

Happy Helloween! by W. Lange, auf Flickr
Great!
Some of my Tiny Turbo(s) MOCs!

Concept Buggy by Kamal Muftie Yafi, on Flickr

Slance by Kamal Muftie Yafi, on Flickr

Race Hatchback by Kamal Muftie Yafi, on Flickr
Oh wow Kamteey, you are improving so much 😄
@zanna
Thank you! 😃
LEGO, le logo LEGO, la minifigurine et les configurations des briques et tenons sont des marques déposées de LEGO Group of Companies. ©2025 The LEGO Group.
Mecabricks, le logo Mecabricks et tout le contenu non couvert par les droits d'auteur du groupe LEGO sont, sauf indication contraire, ©2011-2025 Mecabricks.
