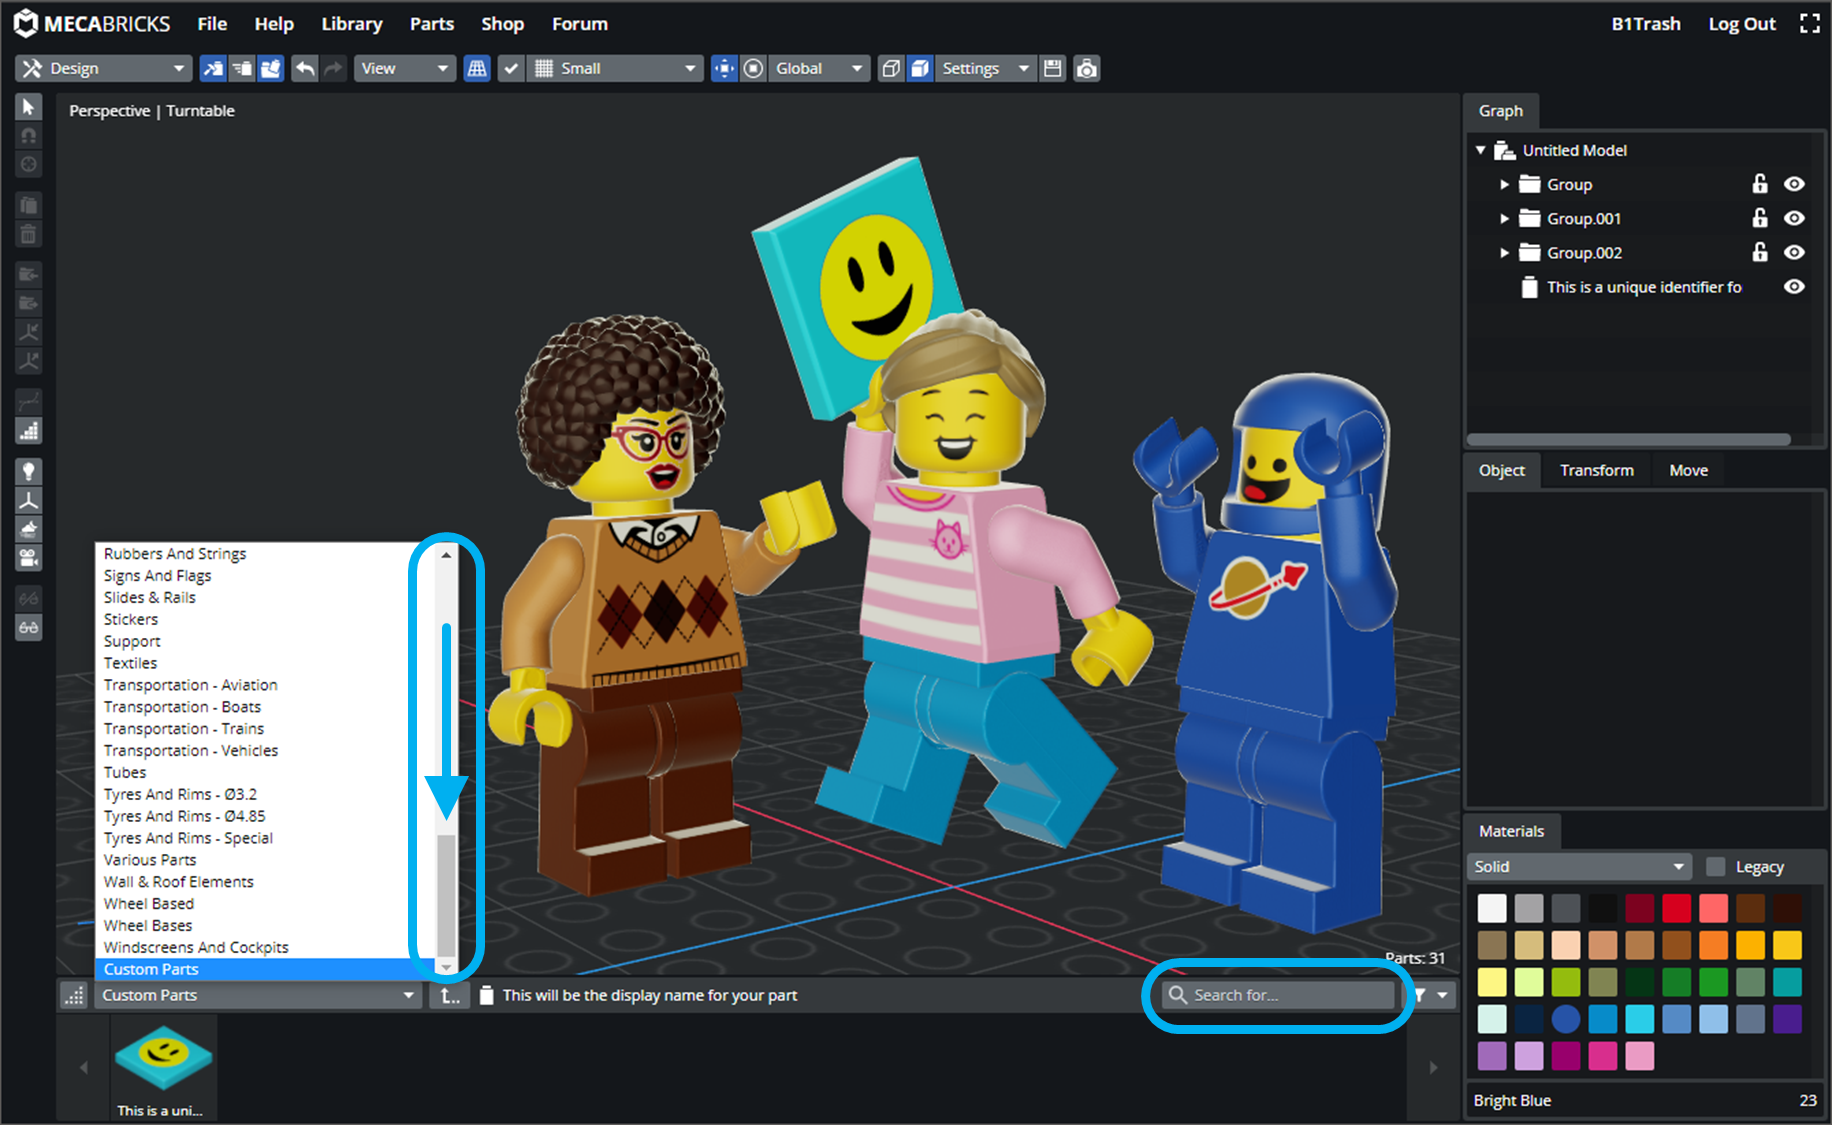
If you're wondering how to make a custom decoration, here is a step-by-step tutorial, current as of April 2023.
Contents:
Contents:
Contents:
Contents:
Contents:
Contents:
Contents:
- Step 1: Can I decorate this brick?
- Step 2: Download a UV map
- Step 3: Create your image
- Step 4: Create your custom decorated part
- Step 5: Render an icon
- Step 6: Use your part
Part Management:
Minifigure:
I hope this helps. Cheers!
- sdfsdf
-sdfsdf - sfdasdf
-
- sdfs
-- sdfsf - sdfsdf
- sdfsf
- sdfs
- sdfsdf
link
sdfsf
test code
[ ] sdfsdf
Footnotes
-
Footnote ↩
HOW TO MAKE A CUSTOM DECORATION
Step 1: Can I decorate this brick?
Go to the Part Manager by clicking PARTS in the top menu. Whenever you open the Part Manager you start in the Library page (folder icon on the left side). Now search or browse for your desired part. Once you find your part, if it has a "2" in the top left corner of the image you can decorate it*. Copy the part number. If you can't find your part or it doesn't have a "2" in the corner then you cannot create a customized part in Mecabricks until the model gets updated.
*See Step 2 for the exception

HOW TO MAKE A CUSTOM DECORATION
Step 2: Download a UV layout
Go to the Part Manager and switch to the Parts page on the left side (brick icon). Click on Custom and enter your part number in the Configuration Name window. Click the search icon and your part should pop up. Select Decorated and you will be given a drop-down of UV layouts to use. These are a visual map that show what parts of your image will go on what parts of the Lego piece. Take a look through the UV layouts and use the Textures preview window see which UV layout will work best for you. Then download it to use as a template.
If the DECORATION section is missing then you cannot decorate that part. Most likely you will find that these parts did not have a customizable UV map created because LEGO never decorated the part themselves. If LEGO has a print or a sticker for a part and there is no DECORATION section, I recommend posting an issue as a new message thread in the Bug Reporting forum.

HOW TO MAKE A CUSTOM DECORATION
Step 3: Create your image
In a nutshell, make an image that will fit within the bounds of your chosen UV map. It should be the same dimensions as the UV layout image that you downloaded (ex: 1024 x 1024 or 512 x 512 px). There are many free programs you can use to make your image such as GIMP and Inkscape, or paid programs like Adobe Photoshop, Illustrator or Affinity Designer.
Your image should have a transparent background where the decoration is not covering the Lego piece. Since JPG does not support transparency, you need to save your file as a PNG image. (Mecabricks requires a PNG.)
If you want metallic ink for your decoration or want to use a sticker (vs a print) then you will need to supply a Data image as well. Here are the rules for this: https://www.mecabricks.com/en/forum/topic/1582
If you get hooked on uploading decorations, you will start running out of space. You are allocated 5MB of space for your decorations. In order to maximize the use of this space, you can use tinypng.com to compress your files. In most cases you will not be able to tell a difference but it will drastically reduce the file size.
HOW TO MAKE A CUSTOM DECORATION
Step 4: Create your custom decorated part
Go to the Part Manager and switch to the Parts page on the left side (brick icon). Click on Custom and enter your data. Here is a breakdown of what is there:

1. REFERENCES
Enter a Reference name for your part. This is what will show up under your part icon in the workshop parts bin. It will need to be unique within your decorations in Mecabricks. The app will not let you reuse a Reference name.
2. NAMES
This is the display name of your part. It does not need to be unique and Mechabricks will not throw an error if you double up on names.
3. CONFIGURATION
This is the part number that you copied from before. Sometimes you may need to click the button twice to make it search.
4. MATERIALS
Click on the dot to choose a color.
5.DECORATION
Choose Decorated and then select the UV layoug that you used to build your image.
Click the + on the Colour line to upload your image file. If it show up looking all weird in the 3D view, check to make sure that you used the correct UV layout. If you made a Data file, upload it too.
6. STORAGE
Choose a storage location.
7. CREATE
Hit the Create Button
Here's a video from Scrubs:
[youtube]wzOnoN9Iv-w[/youtube]
HOW TO MAKE A CUSTOM DECORATION
Step 5: Render an icon
After you create your part, you will be given the option to Render an Icon in the upper right hand portion of the page. Doing this will make it easier to find it in the workshop parts bin. There are a few controls that you can use when rendering an icon.
The first set is the rotation controls. This is especially helpful if you've decorated a part where the design is hidden on the back of the piece in the rendered icon. For instance, if you've decorated a right arm or the side of a right leg, you can type 90 into the RY box. This will rotate the piece around so you can see the decoration that you made.
The other control you have is a checkbox to Subdivide. This will smooth out round edges by adding extra geometry to the part model before rendering. However, this extra geometry has the possibility of distorting the texture on your parts. The visibility of these effects will vary from part to part. Of course, the icons are displayed super small, so it may be difficult to see any meaningful change on screeen. I'd also like to point out that this will only affect your rendered icon, not how the part looks in the workshop.

HOW TO MAKE A CUSTOM DECORATION
Step 6: Use your part
In the Workshop
Congrats! You are done. Your part will be available immediately* in the workshop. Open the drop down menu in the part library and scroll down to the bottom to find the Custom Part category. Additionally, you can search for your part's Reference or Name on the right of the part library.
*If you had the workshop open in a different window when you create your part then you will need to refresh the workshop window before you can see the part.
If you save a model with your custom part and make it public then anyone can use your custom decorations until you delete them. Also, if you make any updates to your images, this will update the decoration for anyone that is using that part as well.
In the Part Manager
To access your parts in the Part Manager, you can get to them a few different ways.
The quickest way is to hit the PARTS link in the top header which will bring you to the Library page. Then hit the Custom button. This will allow you to browse your parts. If you have parts in folders, you will need to navigate using the Library Tree in the left sidebar. If you have parts in hidden folders, they will be hidden here too. To open a part in the custom part builder, select it and then hit edit on the right sidebar under the 3D view.
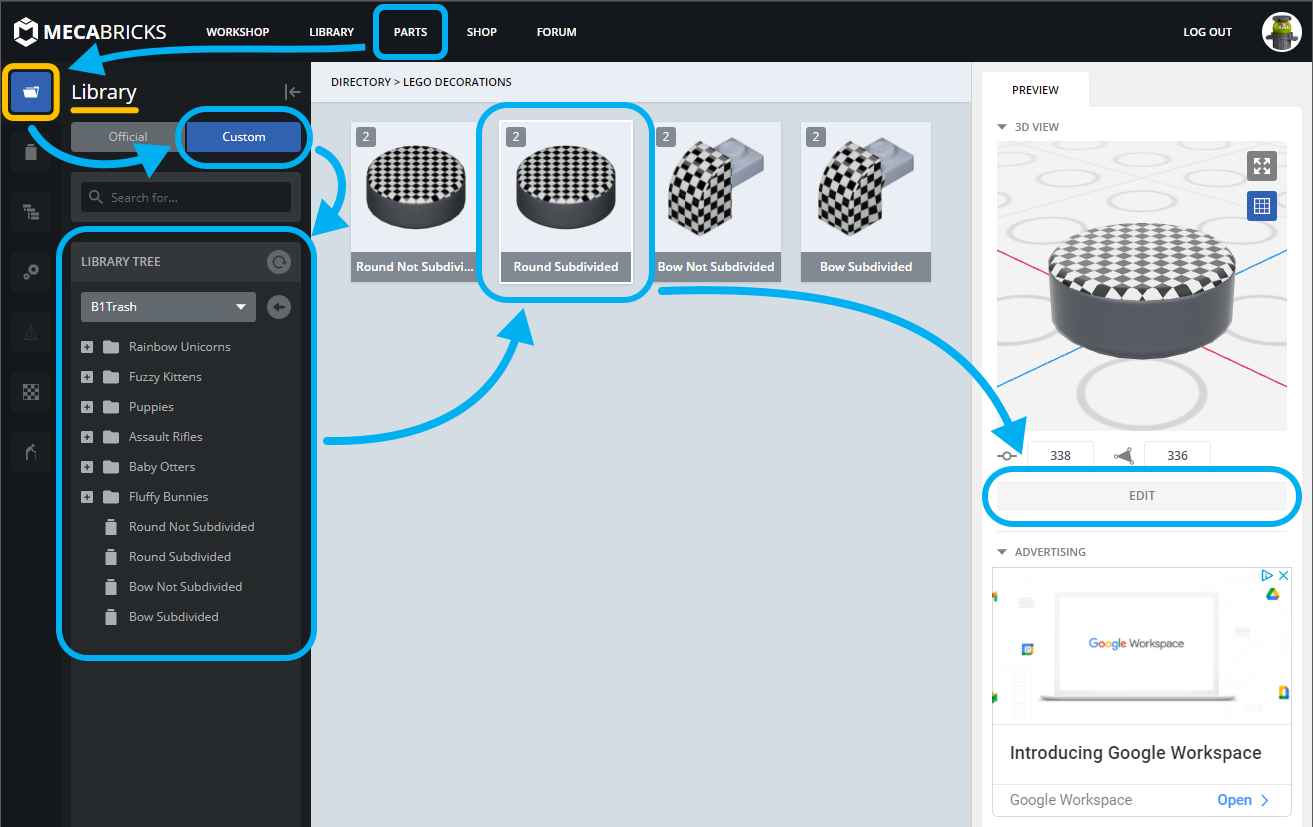
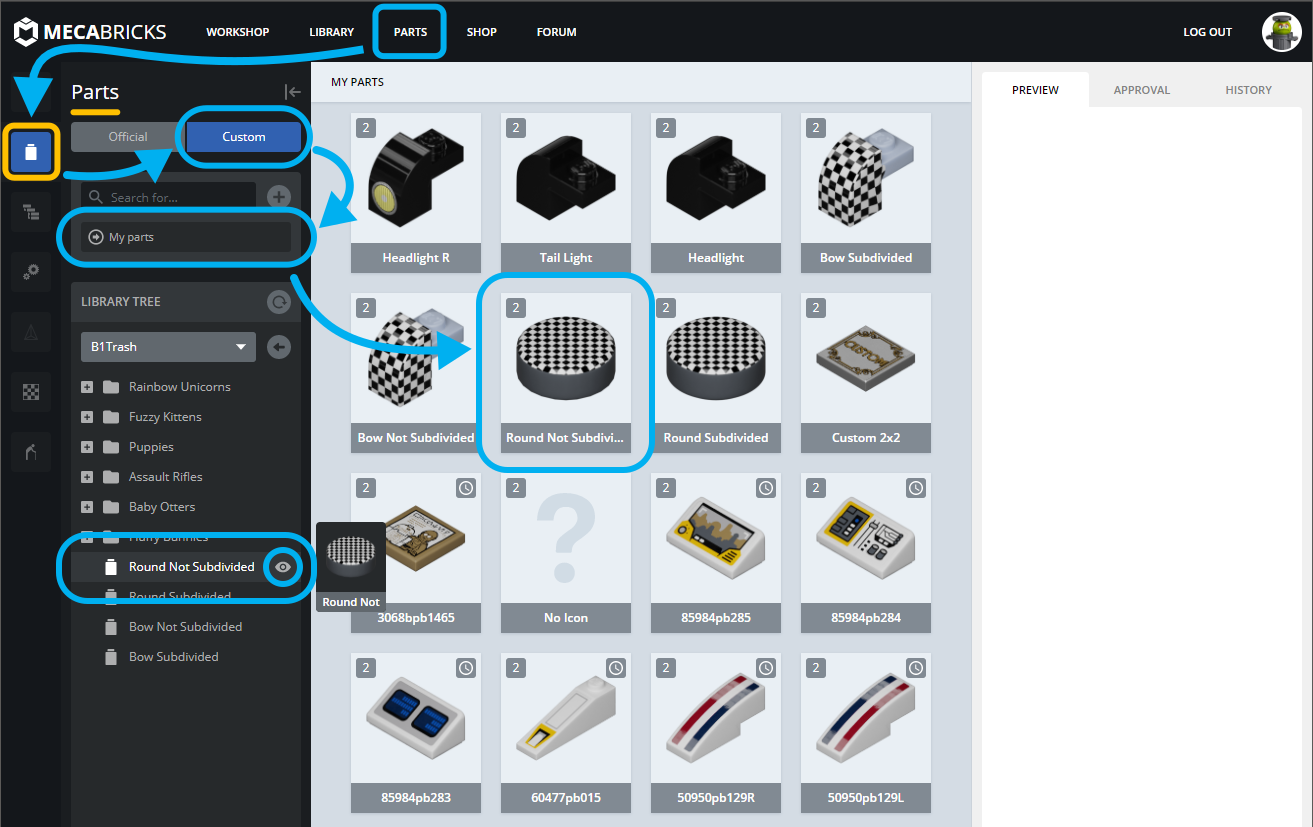
To see all of your parts at once, open the Parts page by clicking the Lego Brick in the left sidebar. Then click the Custom button and below that you can click My Parts. Clicking on any icon will open that part in the custom part builder.
Any time you are in the Parts page, if you hover over a part name in the Library Tree, you will get an eyeball icon. If you click on that, it will open the part in the custom part builder. This icon will not appear if you are in the Library page.
HOW TO MAKE A CUSTOM DECORATION
Managing your textures
Mecabricks users are allocated 5MB of decoration storage. Depending on the file size of your images and how often you upload, this can fill up rather quickly. Did you know that when you delete a part, the image remains in your storage space? When you create a custom decorated part, you are doing two things.
- You are creating the part, which is telling Mecabricks what to call it, what color it is, and what texture image to use.
- You are uploading a texture image to the server.
This second part is important because it works behind the scenes, but it is the part of your decoration library that will fill up.
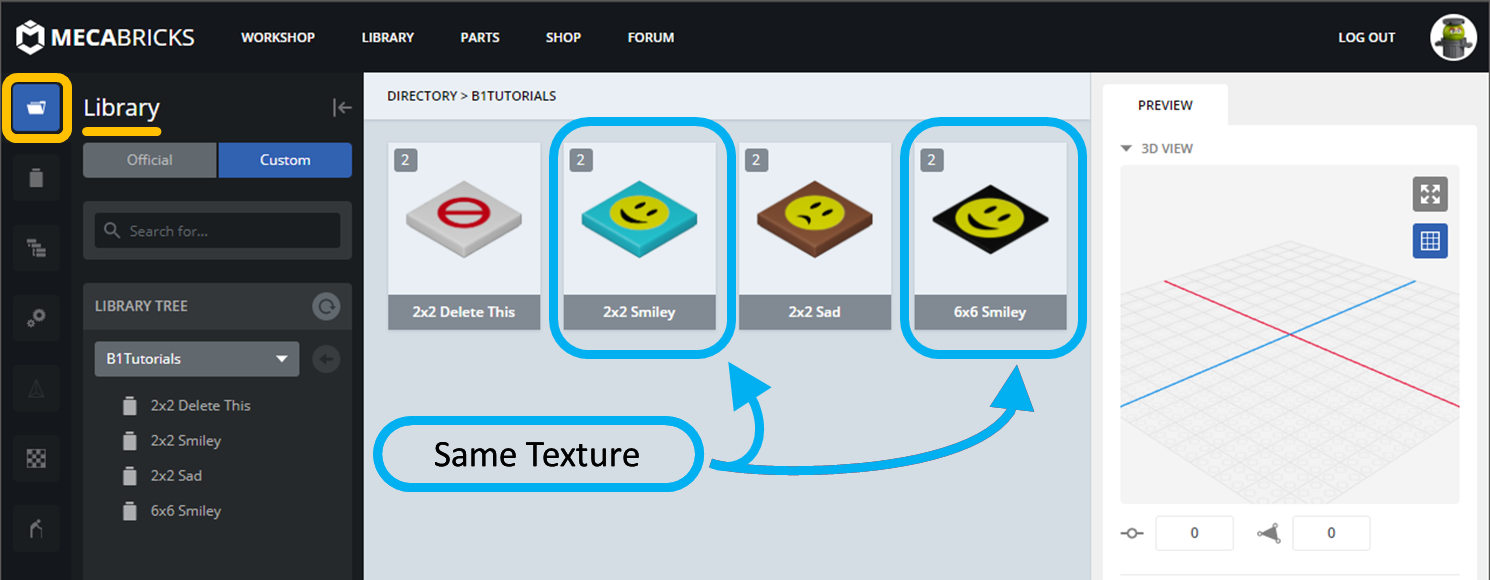
To access your texture images, open the Part Manager and switch to the Textures page by clicking on the checkerboard icon on the left side. Here you can see how much of your allocated space you are using. If you click on one of your images, you will get a large preview and below that you will be able to see what parts are using your image. You cannot delete a texture image that is currently being used. If there are no users, then delete away.

As you can see, I have three images in my personal Textures library. However, they are being used on four different parts because I used the smiley texture image twice. This case will happen if you use the same file name for the texture on two different parts. Because they are tied to the same image file, any updates to that image will affect both pieces. An important thing to consider is that if you do a decoration and then recolor it for a variation make sure to save the new image with a different name before you upload it.
Invisible textures
Sometimes texture images appear invisible on the Textures page. They are visible in the workshop, but not here or (sometimes) the Parts page. It seems that this is due to Mecabricks not liking certain characters in the file name. The first three images in the picture below are all the same image file, but with different names. Mecabricks does not like the apostrophe ' in can't_see.png or the parentheses () in (invisible).png. Brackets [] are ok as well as underscore _ and dash - symbols.

Double images
Sometimes you will find a texture image listed twice on the Textures page. This is likely because you accidentally uploaded a Color image in the Data line or a Data image in the Colour line. For an example, I uploaded my x2_color.png image in the Data entry. No big deal, as it was easy to fix and upload the correct image.

However, now I have two of these images in my Textures page. Which one belongs? One way to determine is to click on each image. The one that has no users is the one you should get rid of.

Another technique you can use to find rogue images is to filter your Texture library. Uncheck the box next to Colour and click My textures. This will bring up only textures that you've uploaded in the Data entry on the Parts page. All Data images should have a black background, so it's pretty easy to spot the Impostor. X2_color.png has a clear background and no users... this image should be deleted.

One final thought on managing your textures is to do some kind of image optimization to reduce file size. Tinypng.com is a simple tool that can save a good amount of space in your personal Texture library.
HOW TO MAKE A CUSTOM DECORATION
Deleting parts (and textures)
Let's say that we want to delete our "Delete This" part. To do this, open the Parts page (Lego brick icon on the left side), click on Custom, click on the eye next to your part and then click on Delete.
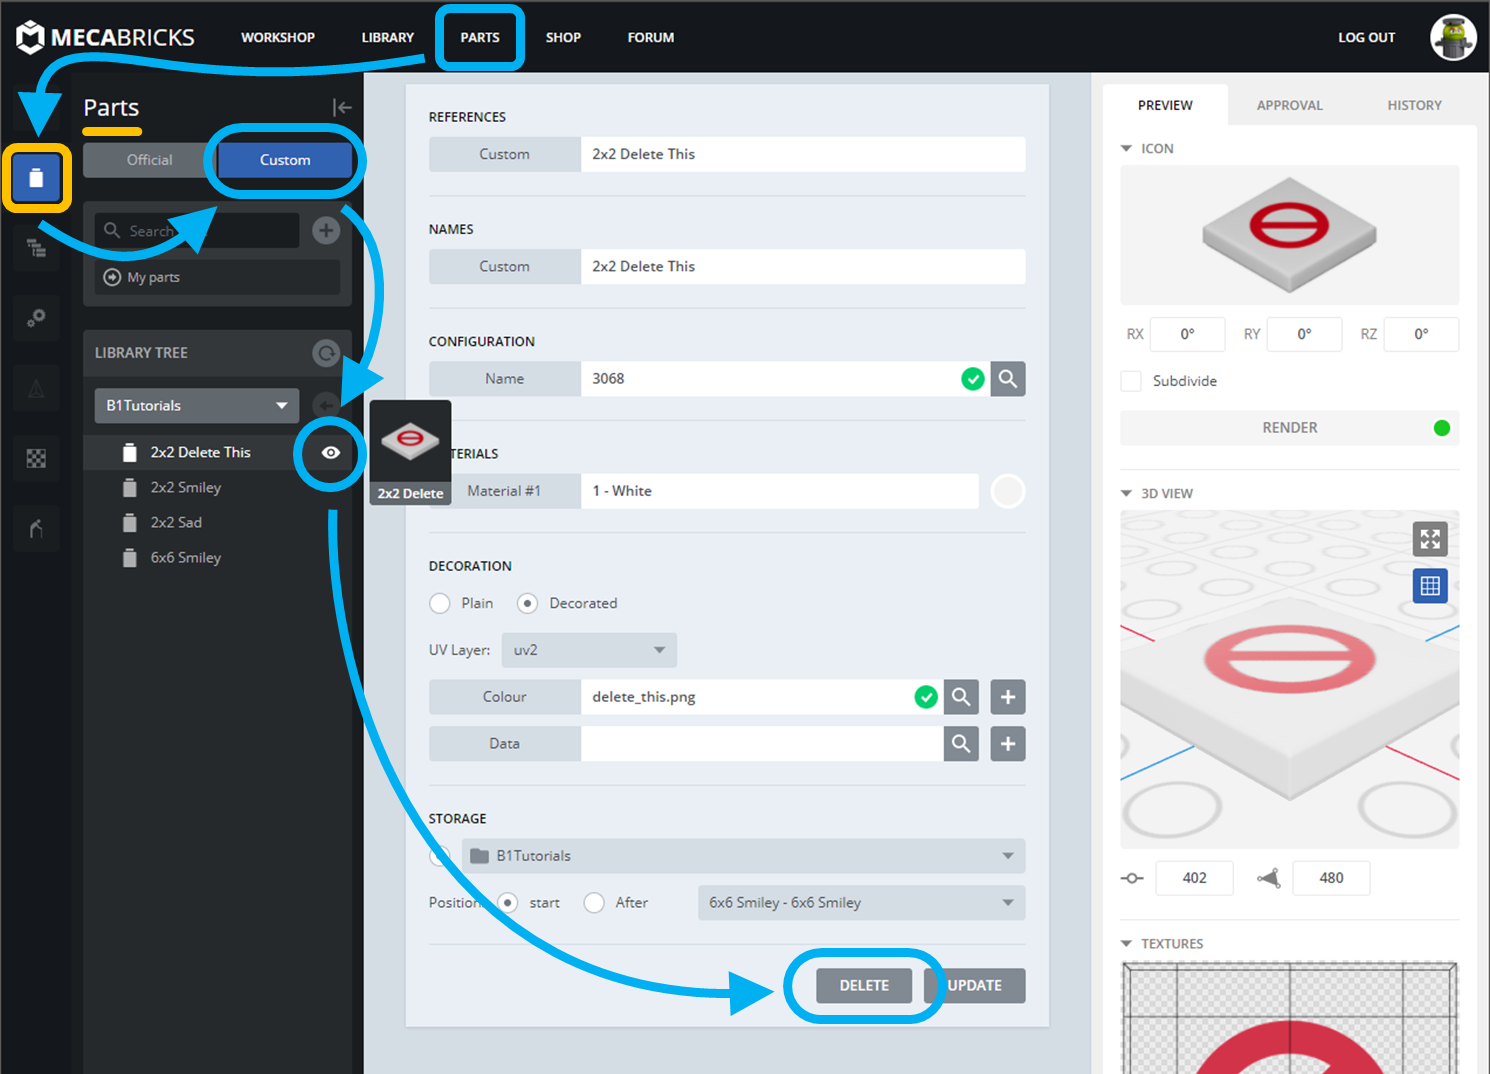
Now our part is deleted but the texture image is still there.
Open the Texture page (checkerboard icon on the left side) and choose the image you want to delete. If it has no users, then you can click on the Delete button.

HOW TO MAKE A CUSTOM DECORATION
Building a Minifigure
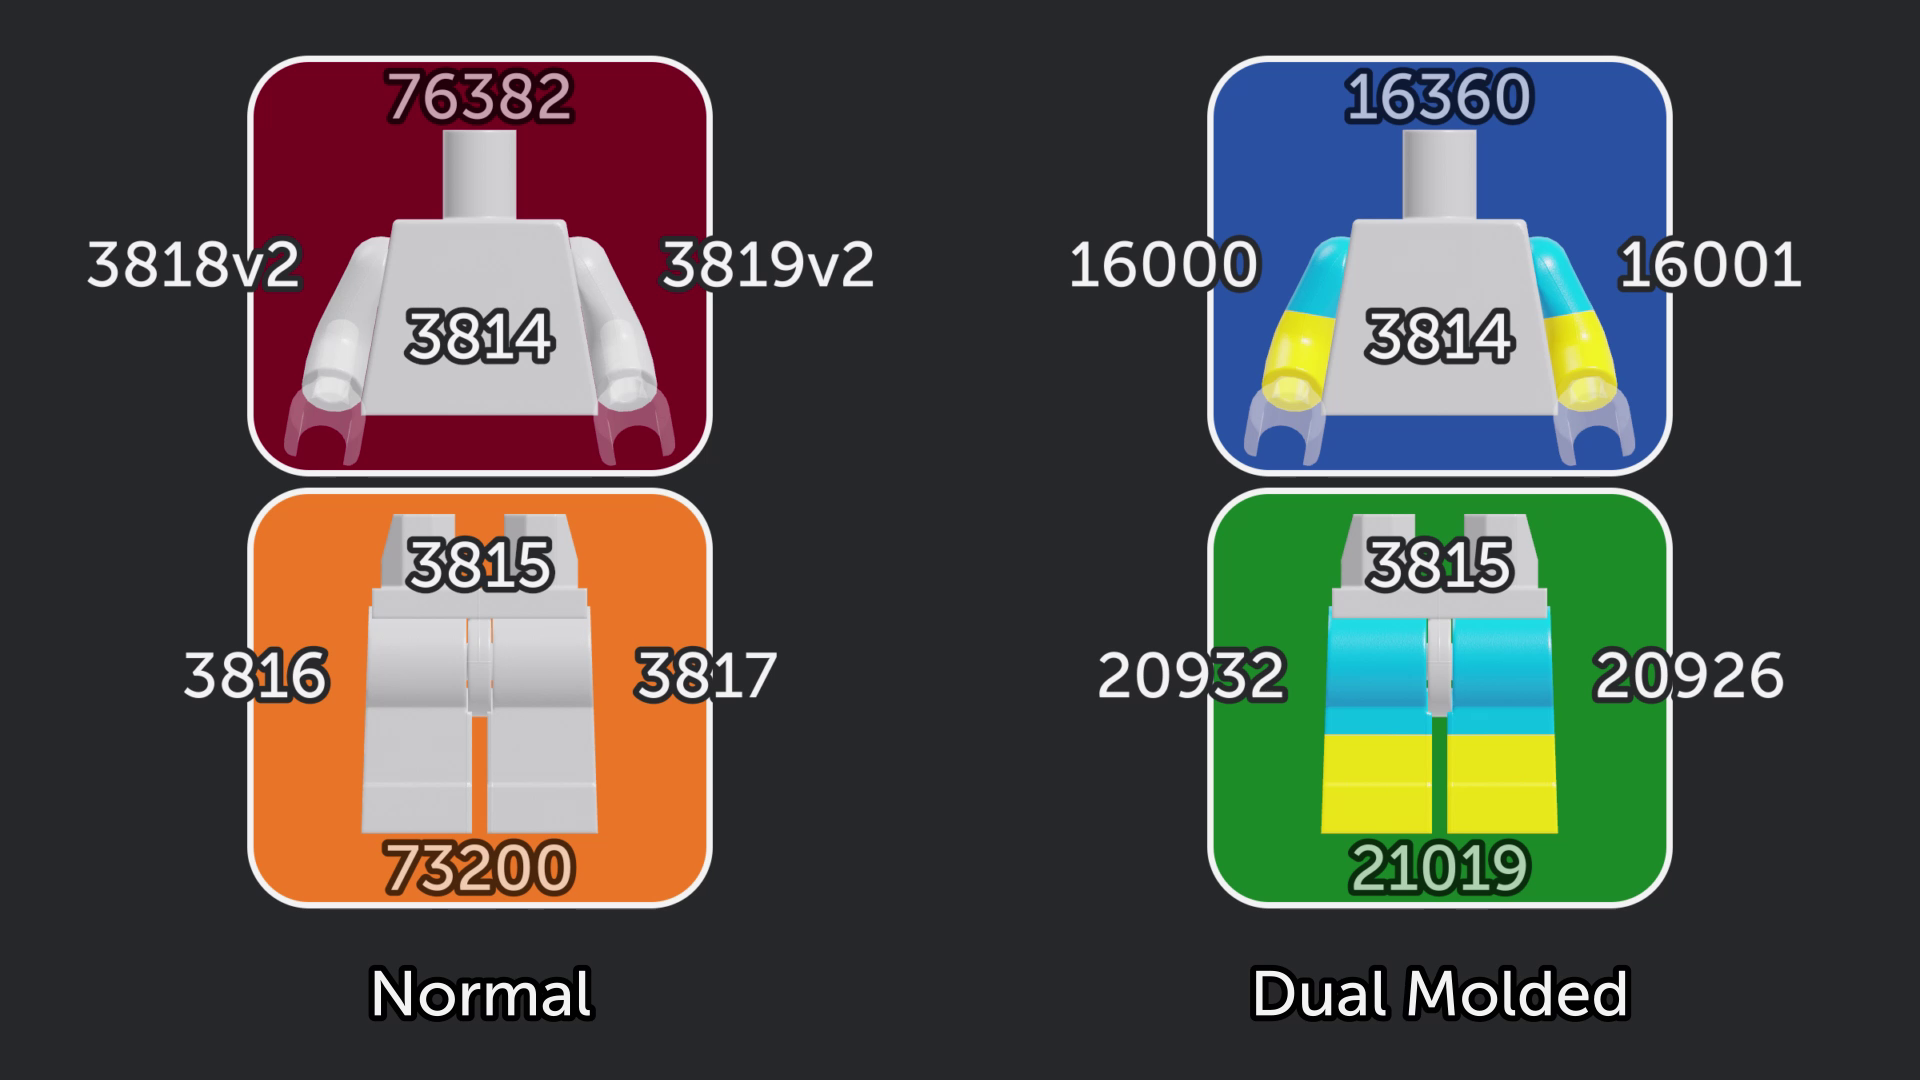
In general, minifigures have 3 basic components: the Lower, Upper & Head. In addition, there is usually some type of hair, hat, or helmet to top it off. However most of these cannot be decorated. This post will focus on decorating these 3 basic components. Here is a graphic that shows the different part numbers for both the Lower and Upper assemblies. Also, when I refer to Left and Right limbs, these are from the minifigure's perspective, not as you would see looking from the front.
Form Feet and Legs
Using the chart above, a normal lower will be part# 73200, and is made up of a Left Leg (3817) and Right Leg (3816) that attach to a Hip piece (3815). To build the lower, you need to have these three parts made first. If you want to do a dual molded lower, then you will need to use part# 21019, which uses regular Hips (3815), but both legs must be dual molded as well (Left 20926 / Right 20932). Using the instructions above, apply decorations to the legs and hips that you need. If an individual part will not be decorated, you don't need to create a blank one. For this example, I will be making a dual molded lower. I'll start with the Hips:
- Start with a UV map as a template. I like to use uv4 for hips because it is very space efficient.
- Design the decoration using the UV map as a guide on where to place the decorations.
- Remove the UV map and save the image as a PNG file. This will be the Color Image.
- If you want metallic colors, you need to submit a Data Image. Make a copy of your Color Image. Then change anything that should be metallic to RED (Hex color code #FF0000) and the rest of the image black (#000000). Save it as a PNG as well. This will be the Data Image.
- I use [url]https://tinypng.com[/url] to optimize my images. This will shrink my images to 20-30% of their original file size. This will also convert them to PNG-8, which is what Scrubs recommends.

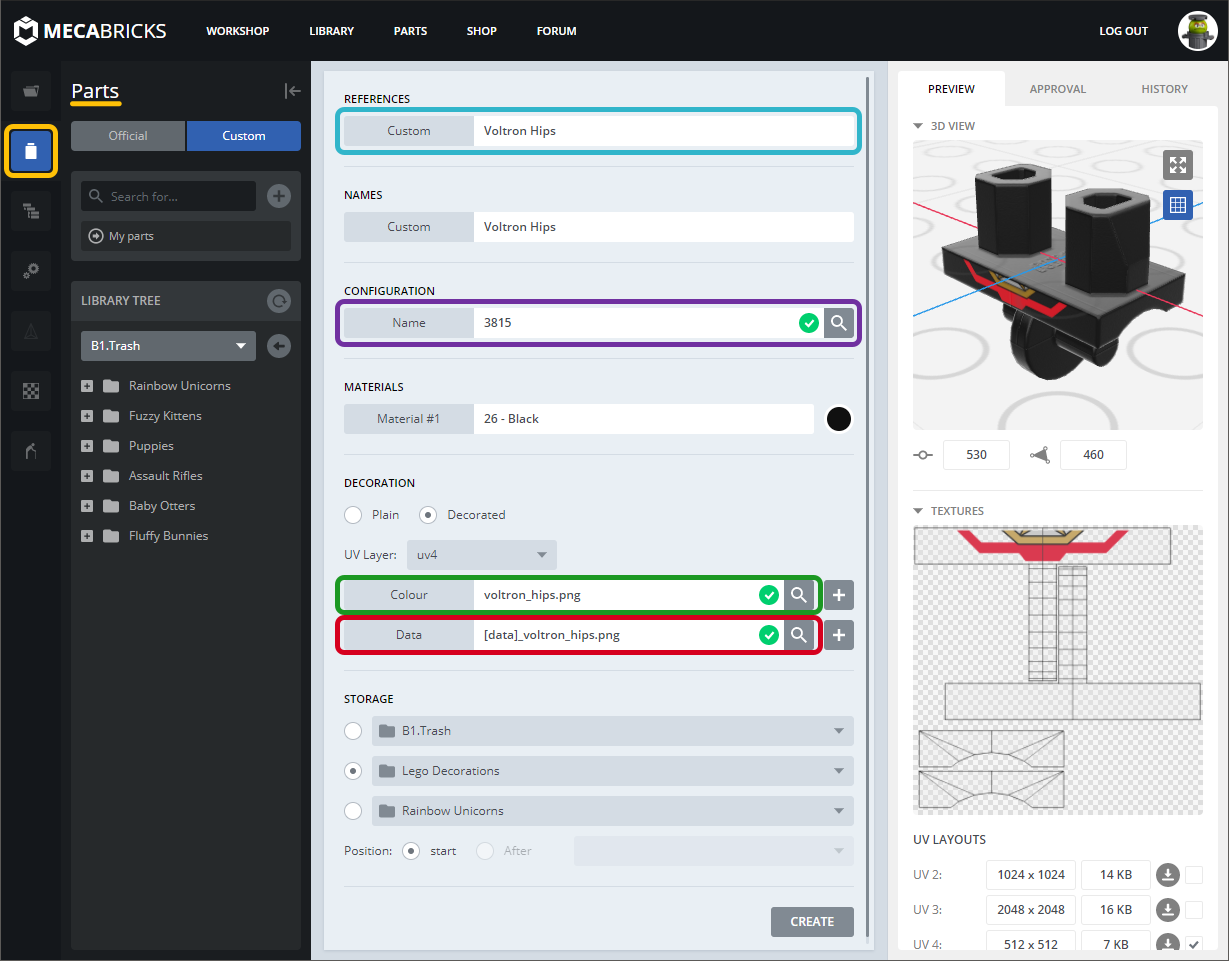
Create the part using the instructions from Step 4: Create your custom decorated part.
Here are some highlights:
- Reference - [VoltronHips] You will link to this name when you build the Lower assembly. Remember this.
- Name - [Voltron Hips] Optional, can be the same as the Reference
- Color Image - [voltron_hips.png] This is highlighted in green in the image above and below.
- Data Image - [[data]_voltron_hips.png] This is highlighte in red in the image above and below.
- Check the 3D View and TEXTURES image windows to make sure that you have the right UV map selected. If your decoration doesn't line up, change to the UV map that you used as a template.
Do the same thing for each of the legs. You should now have 3 parts created, a Left Leg, Right Leg, and Hips. To make it easier to tell when I used Reference vs Name, I made each one different. Here is what I named them:
Part - Reference - Name
Hips - VoltronHips - Voltron Hips
LegR - VoltronLegR - Voltron Right Leg
LegL - VoltronLegL - Voltron Left Leg

Now create a fourth part. Since this example uses Dual Molded legs, use the Lower part# 21019 in the Configuration Name field. (For normal legs, use Lower part# 73200). When you double click on the magnifying glass, things will look different. That is because you are now building an assembly instead of a part. In the ASSEMBLY CONTENT section, put in the Reference for your Hips, Right Leg, and Left Leg. Fill in the rest of the fields and hit CREATE.
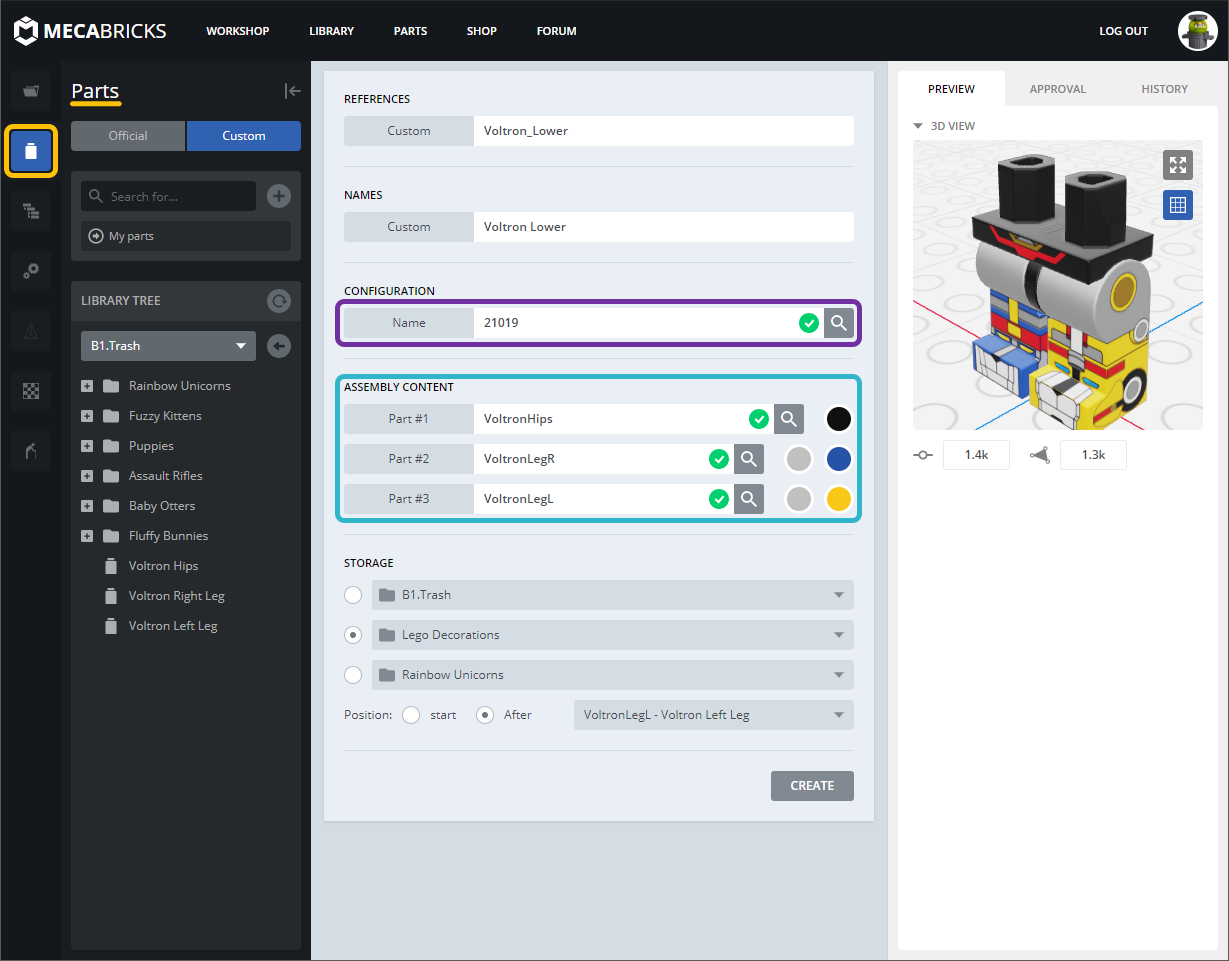
Congratulations, you should now have a Minifigure Lower part. Don't forget to render an Icon.
Form Arms and Body
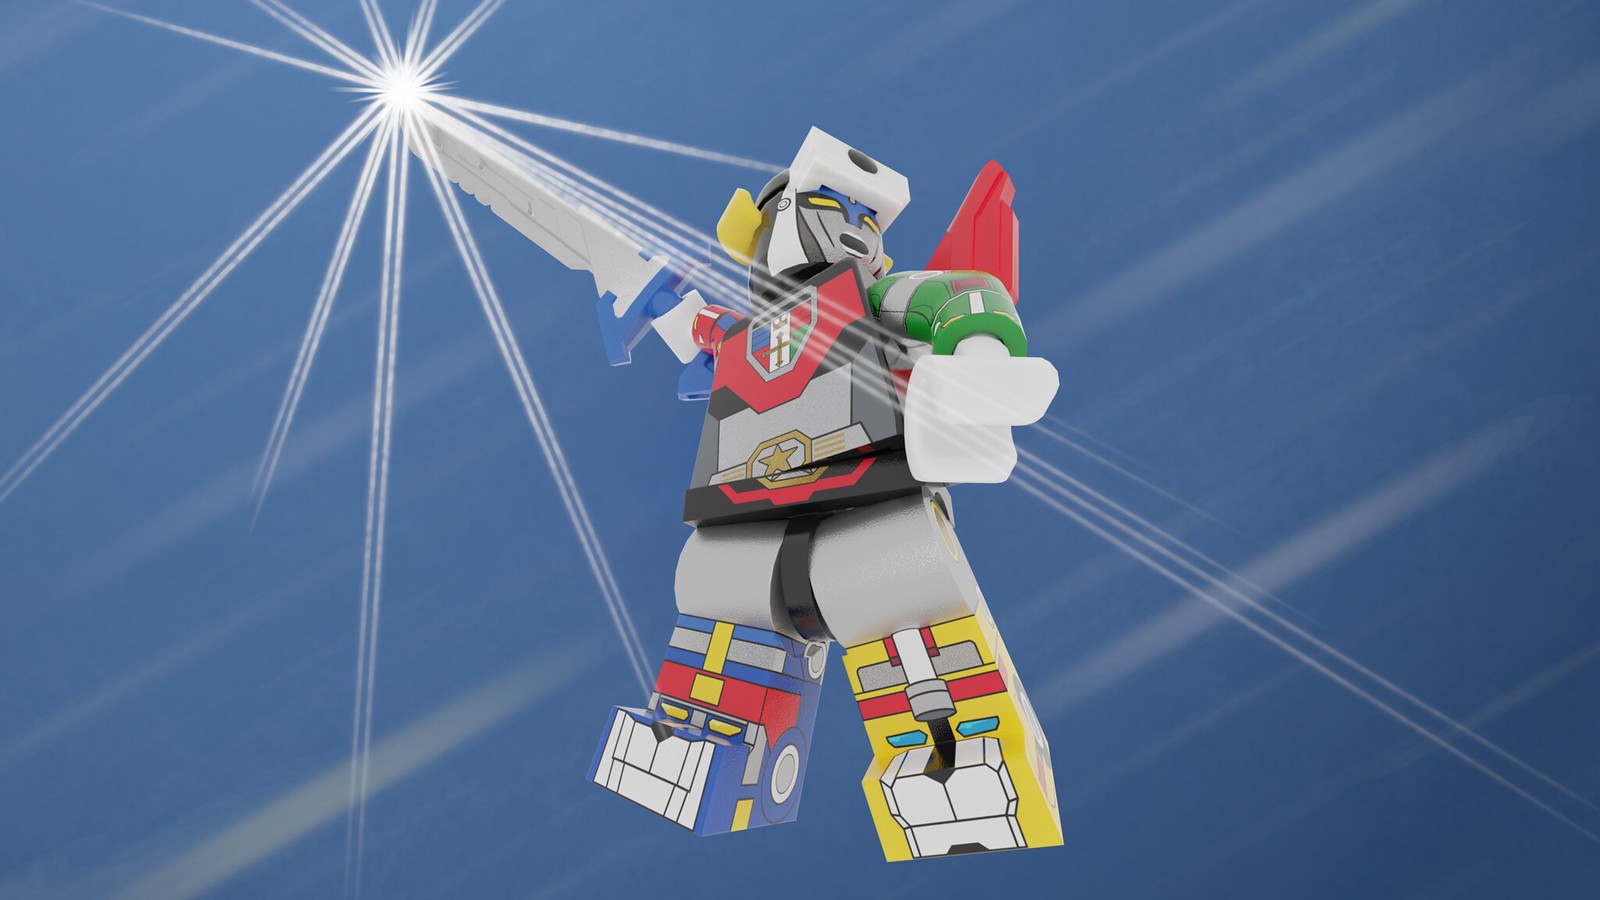
Creating the Upper (73200) is the same process as the Lower. Create a Torso (3814), Right Arm (3818v2) and Left Arm (3819v2). Again, if you are not decorating a part, you do not need to create a blank part. If you do not want arm prints, then you do not need to make blank arms. When you build the upper, just put the Part# into the ASSEMBLY CONTENT section. Since we cannot decorate hands, this is what we will do below. Additionally, this will be a Dual Molded Upper (16360), so in addition to the base Torso (3814) we will also need to use the Dual Molded Right Arm (16000) and Left Arm (16001). Here is how I named the parts that I built for the Torso, Right Arm, and Left Arm:
Part - Reference - Name
Torso - VoltronTorso - Voltron Torso
ArmR - VoltronArmR - Voltron Right Arm
ArmL - VoltronArmL - Voltron Left Arm
Again, put the References into the ASSEMBLY CONTENT fields for your decorated parts. For undecorated parts like hands, put in the part number, which is hinted in light grey numbers. This works for any part you didn't decorate. In addition, if you want to create a different Upper or Lower from what I've described, you can use these light grey numbers to show you which parts make up the assembly. When you bring in an undecorated part, you will need to add a Material Color to it.

And I'll Form the Head
Now that we've done this, the head will be simple since it is just one part. However, there are multiple head molds to choose from. If you are doing your own customs, it probably doesn't matter. But if you are recreating a Lego part then you should use the same head piece that Lego used. The modern head with a hollow (recessed) stud on top is part# 3626v2. It's red in the image below. This graphic shows the differences between the different options. So far, the 28621 head has only been used on transparent parts, but I don't know if that will change in the future. Create the head just like any other part.

Now that you've created your parts, get into the Workshop and build your minifig.
Reserved for future use
thx
how do you just change the colors of the printing?
@SlimBrick1 You shall alter the texture manually in an external software. Only base materials can be changed. Not paint or stickers.
oh okay, thank you!
I dont see the decorated thing in step 2
What part are you trying to decorate?
A toso
torso*
Are you doing 3814 or something else? If you are doing 76382 then you are working with the entire upper. The correct order of operations is to create the torso (3814). Then create the upper, which builds off of the torso and adds arms and hands.
okay I'll try
LEGO, le logo LEGO, la minifigurine et les configurations des briques et tenons sont des marques déposées de LEGO Group of Companies. ©2026 The LEGO Group.
Mecabricks, le logo Mecabricks et tout le contenu non couvert par les droits d'auteur du groupe LEGO sont, sauf indication contraire, ©2011-2026 Mecabricks.