OBSOLETE
In order to provide the necessary information to the 3D engines, a certain number of textures are required:
- Diffuse Map - It defines the colour and pattern of the object.
- Materials Map - It defines the base materials (e.g. Solid ABS, rubber, etc.), the decorated areas and other information (e.g. colour of speckles)
- Metalness Map - It defines the shinny areas. e.g. Chrome and metal paint, chrome stickers, etc.
- Bump Map - It defines the surface finish for non uniform elements like slopes as well as the sticker shapes.
All the colour values stated in the following sections are decimal values from 0 to 255.
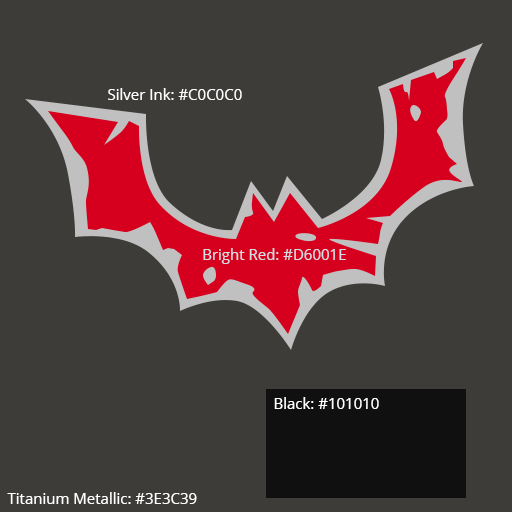
Diffuse Map
Always compulsory. This map shall only contain colour values from the Mecabricks colour chart. For transparent areas ensure that you set the opacity (alpha channel) as per the chart value. e.g. 70% opacity for Transparent red 41. The final PNG file submitted to Mecabricks shall also include the colour profile set to sRGB IEC61966–2.1.
You can find lots of useful information about how to design this type of texture in these threads:
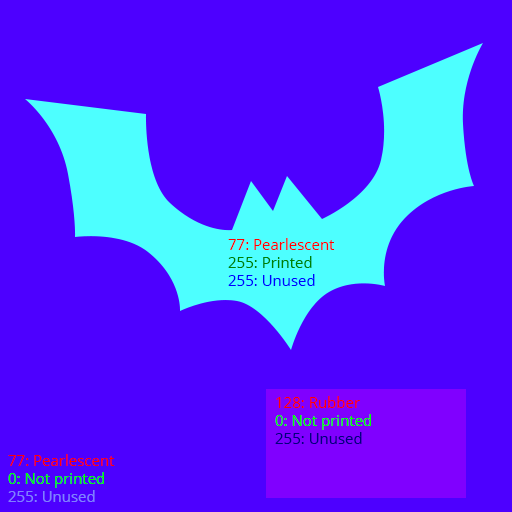
Materials Map
This map is only required for dual moulded elements like some minifigure legs or when the decoration includes advanced materials like glitter, speckle, rubber, etc.
This is a non-colour image texture. Data contained in the RGB channels is:
- Red: Base materials - Do not include stickers or printed areas
- Green: Printed areas
- Blue: Additional information required by the base materials
Red
- Solid: 0
- Speckle: 3
- Transparent: 26
- Glitter: 38
- Chrome: 51
- Pearlescent: 77
- Metal: 102
- Rubber: 128
- Milky: 153
Green
- Non-printed areas: 0
- Printed areas: 255
Blue
- Milky: Opacity value - 255 * opacity [0,1] e.g. for Phosphorescent Green (294): 255 * 85 / 100 = 217
- Transparent or Glitter: Diffuse factor. Only three of them have a value different from 0: Tr. Fluor. Red Orange, Tr. Fluor. Green and Tr. Bright Green shall be set to 26
- Speckle: Speckles colour - 0 (metal), 128 (gold), 255 (copper)
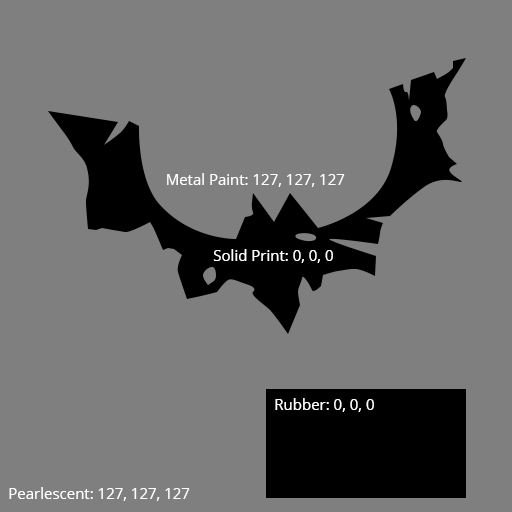
Metalness Map
This map is only required if:
- The base materials include pearlescent, metal or chrome areas
- Printed areas include metal ink paint (334, 335, 336, 337, 344 and 345)
- Stickers include metal or chrome areas
This is a non-colour image texture and all three RGB channels shall be identical.
- Chrome: 255 (#FFFFFF)
- Pearlescent and Metal: 127 (#7F7F7F)
- Everything else: 0 (#000000)
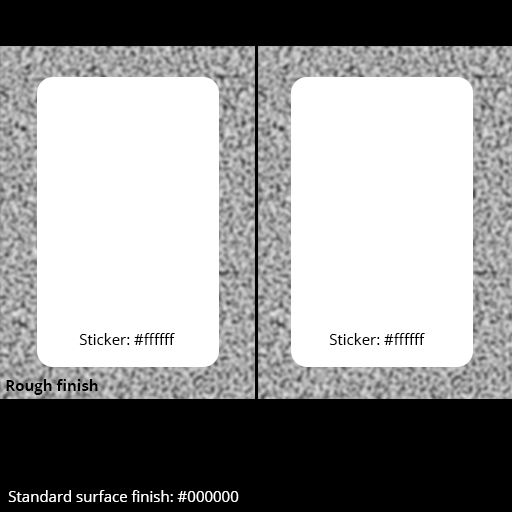
Bump Map
This map is required if the surface finish of some of the faces is rough or if stickers are applied.
This is a non-colour image texture and all three RGB channels shall be identical.
- Standard finish: 0 (#000000)
- Rough finish: Gradient from 0 to 250
- Sticker shape: 255 (#FFFFFF)
Anytime I try to print a custom part it says “E1103: Insufficient storage space.” Even though I have no parts, and all of my textures are deleted. Except for the one I used to measure the part. Mind explaining that, Scrubs?!?!?!?!?!?
Something seems off... I have 175 texture files in my storage, and I'm only using 56% of my allotment. What does the percentage show for your storage space with the three images? How big is the image you're trying to upload?
Delete some of the texture files.
@kahtras... Sorry, I think you misunderstood. What I am saying is that I have plenty of storage space available even with 175 files. I don't need to delete mine right now. I was using that as an example. If you are running out of space with only 3, there is something wrong. How big is the image that you are trying to upload? And what percentage does your texture storage show? It's the number in the red box in this photo:

How do you have so many textures, but only 3 MB
I'll lay out three factors that can help with file limits:
-
Optimize your PNG files. I use [url]https://tinypng.com[/url]. This will shrink the file size down quite a bit... I've seen a reduction of about 60-75% from the original file size. This alone will allow you store 3-4 times more than you would without optimizing the images.
-
The resolution of the image are important as well. One image that's 2k (2048x204😎 takes up just as much space as 16 - 512x512 images. If you have any 4k images, you'll eat up your space in no time. I generally stick to the recommended resolution from the UV map, but there are parts that have multiple maps. I usually use UV map #4 for hips because it's smaller than the other two options. It adds up after a while.
-
Data images are really small once you optimize them. These are only used if you have metallic colors or if you're doing stickers. But if you have these, they'll take up less space than the color images. About 30% of my images are Data images.
I never use 2048 x 2048, also, at the time, I was using up 5 MB of 5 MB without even knowing. That was dumb.
how do you make a data file
This original post on this thread is obsolete... there's another one that has the right stuff, but basically the entire image should be black (Hex color code #000000) except for the following areas:
Metallic print - Red (#ff0000) | This tells Mecabricks to make that area of the brick metallic... it will be a lot more reflective, especially in renders.
Sticker - Blue (#0000ff) | This adds a bump map that makes the area covered look like it's raised... like a sticker. You will probably want to round your corners if you want the sticker to look like LEGO ones.
Metallic sticker - Green (#00ff00) | This tells Mecabricks to make the sticker metallic (or the portion that is green).
To make the file, I recolor anything that is a metallic color to red, and everything else black. If I'm doing a sticker piece, I usually use a picture of the stickered part (or a donor part for custom decorations) as a template to determine how big the sticker should be. The same as before, except green for metallic areas of the sticker, blue for the rest of the sticker, and black for everything not sticker.
[Edit]
Here's the other post:
[url]https://www.mecabricks.com/en/forum/topic/1582[/url]
LEGO, the LEGO logo, the Minifigure, and the Brick and Knob configurations are trademarks of the LEGO Group of Companies. ©2026 The LEGO Group.
Mecabricks, the Mecabricks logo and all content not covered by The LEGO Group's copyright is, unless otherwise stated, ©2011-2026 Mecabricks.