How I rendered Infearno Interception - tutorial
Hi guys! 😃
So many of you have asked me to make a tutorial about my renders, so I wrote this one!
Step 1 - Mecabricks
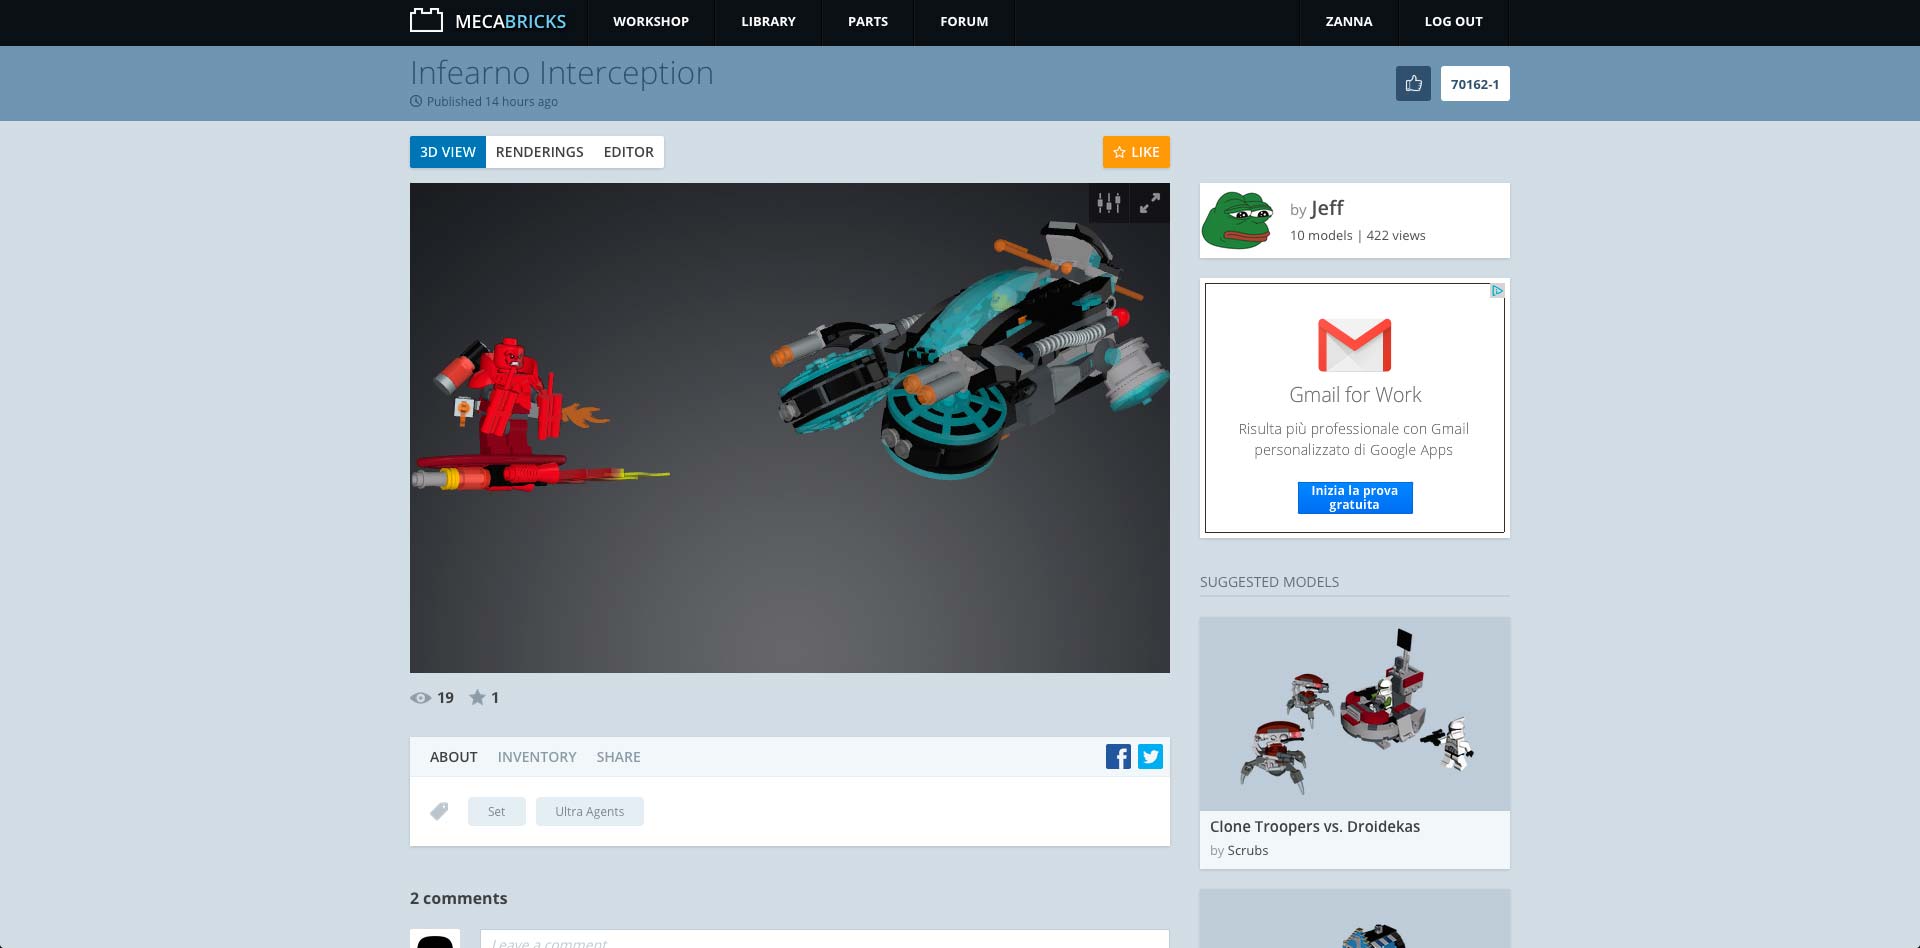
Look for the model you want to render. Hey, this time I found Jeff’s model! Do you like it? 😃
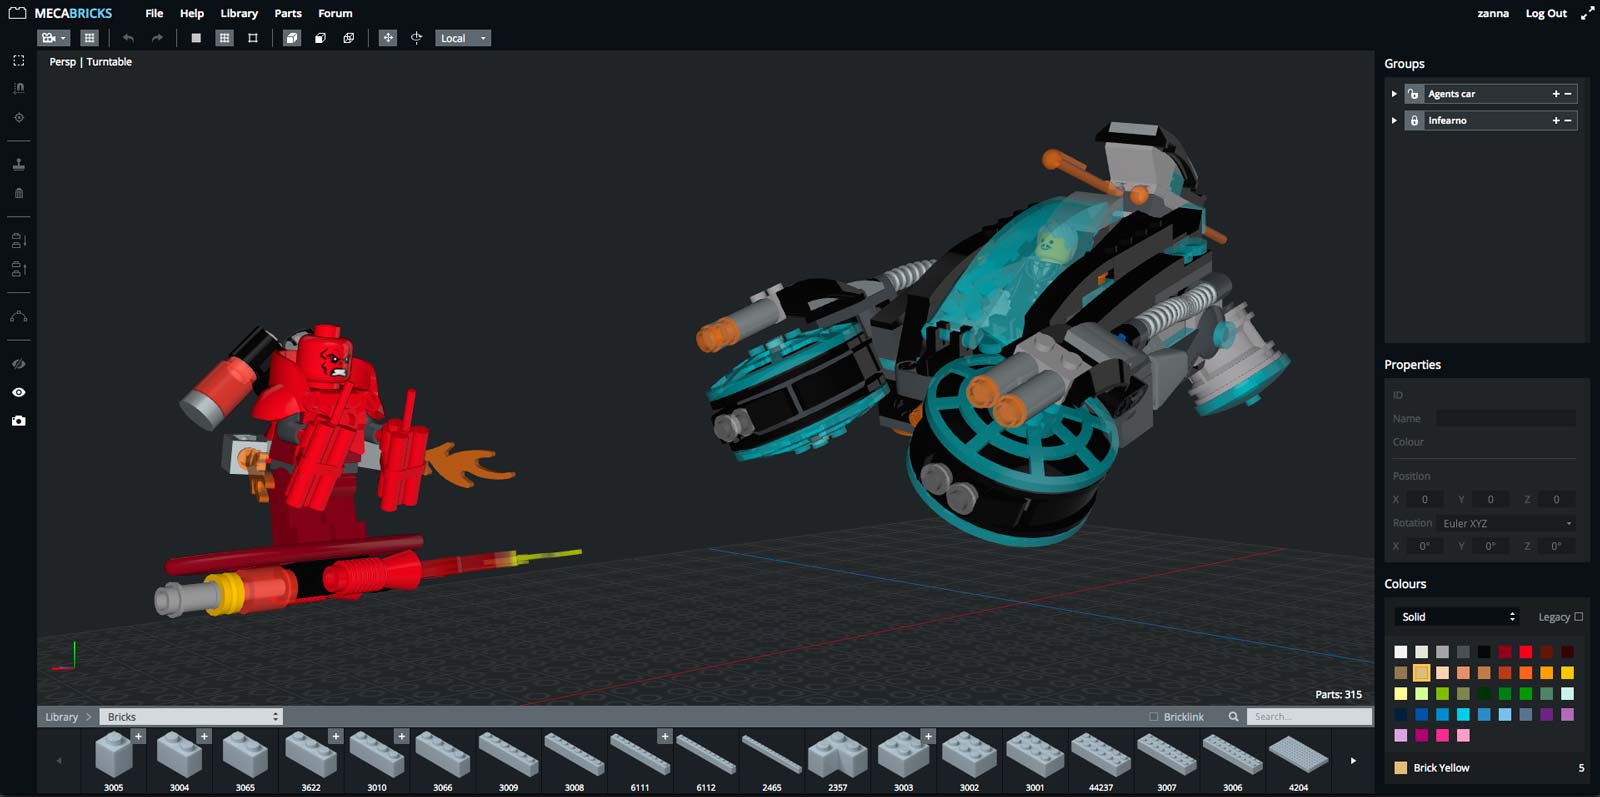
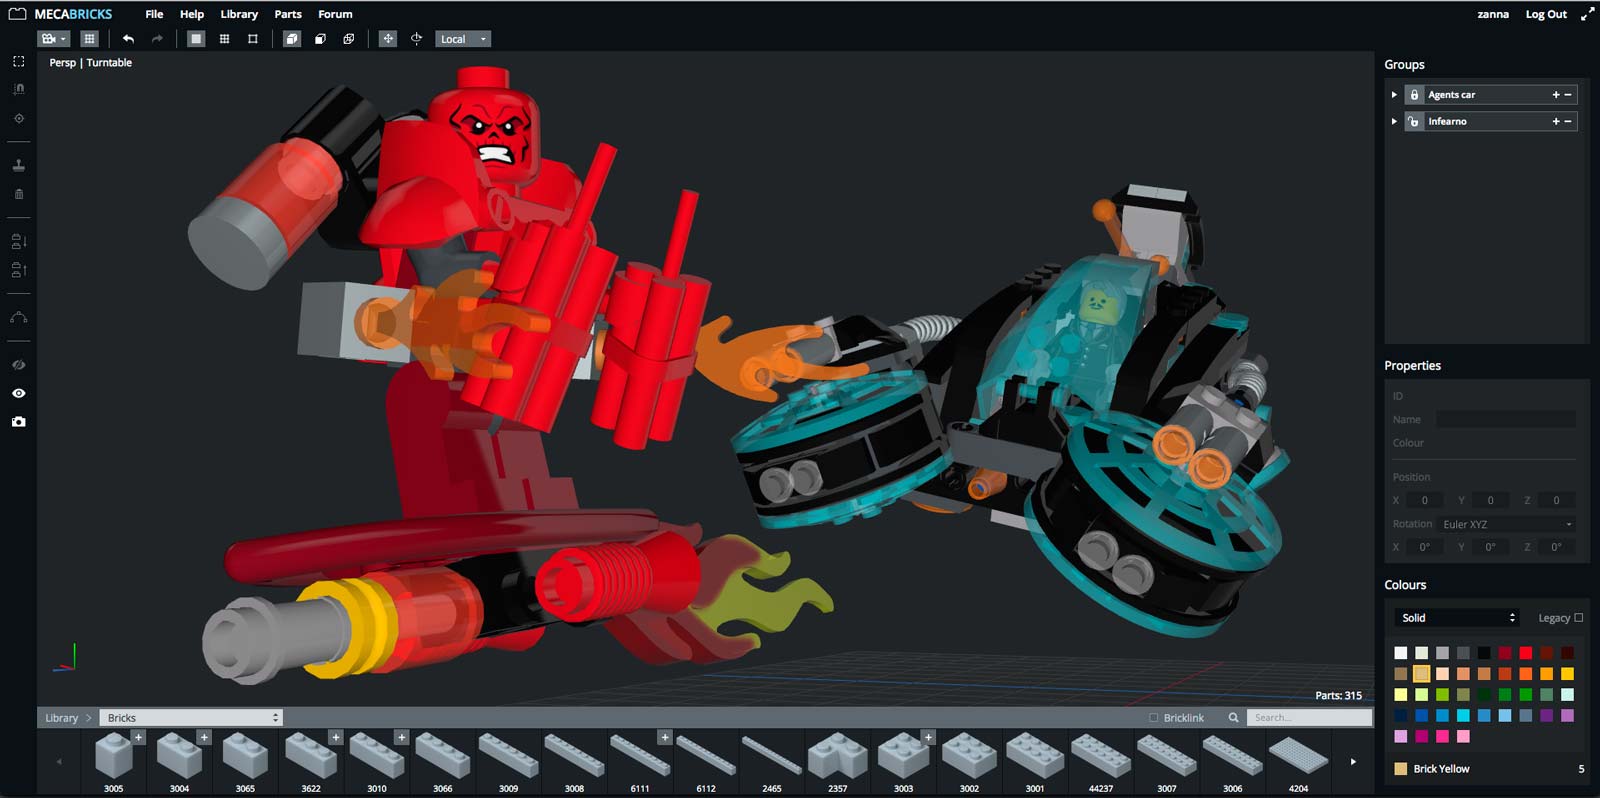
Open your model in the Workshop and start to look for a composition.
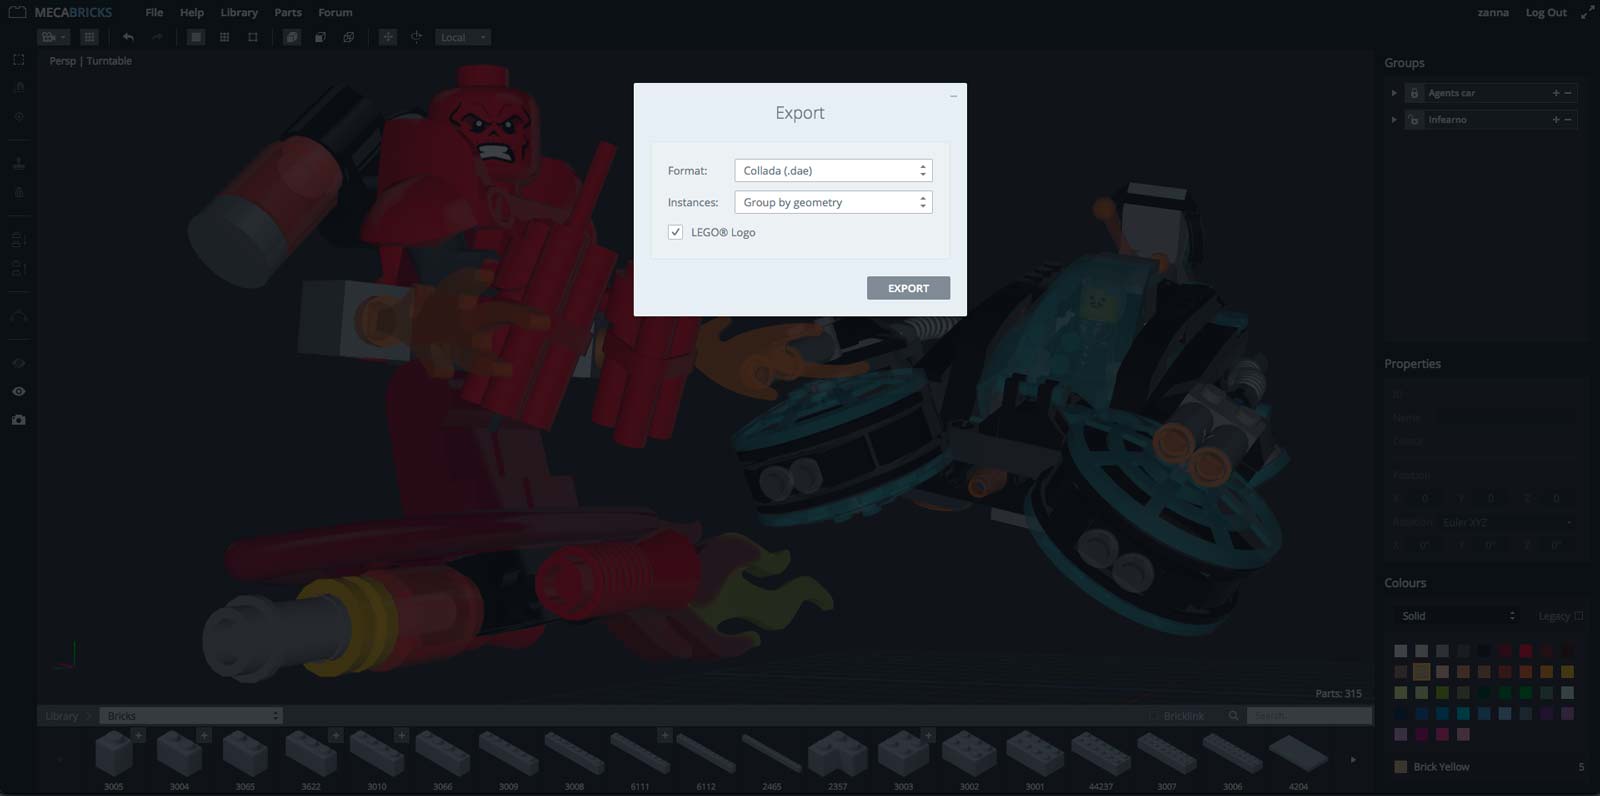
Move pieces and object as you want and finally export it (File > Export).
If you want to use Scrubs’s Blender template select Collada (.dae) format. I usually check LEGO® Logo box and select Group by geometry.
Step 2 - Blender
Let’s open the Blender template.
Follow this useful video-tutorial if you want to learn the basics.
Step 3 - Composition and Camera Settings
Import your model and find your favorite composition. You can move the camera using XYZ coordinates or you can activate a useful option: Lock Camera to View. If you don’t see that panel on the right press N. 🎥
View > Camera (Numpad 0) to see through your camera. If you move your view into the 3D view, your camera location and rotation will change: cool!

Don’t forget to play with camera settings (to see them select your camera and click this icon):
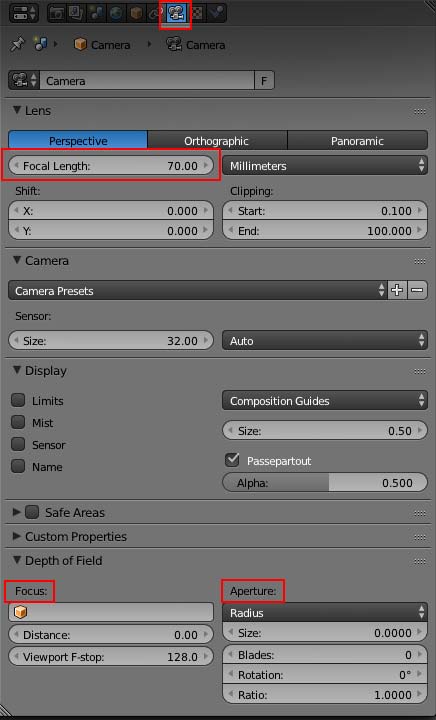
The main settings are:
• Focal Length - here you can find an image that shows how the perspective changes according to the focal length. The less it is, the more the viewing angle is wide, and conversely.
• Focus and Aperture - some months ago I wrote this easy tutorial 😃
I found my composition and I want only Infearno in focus.
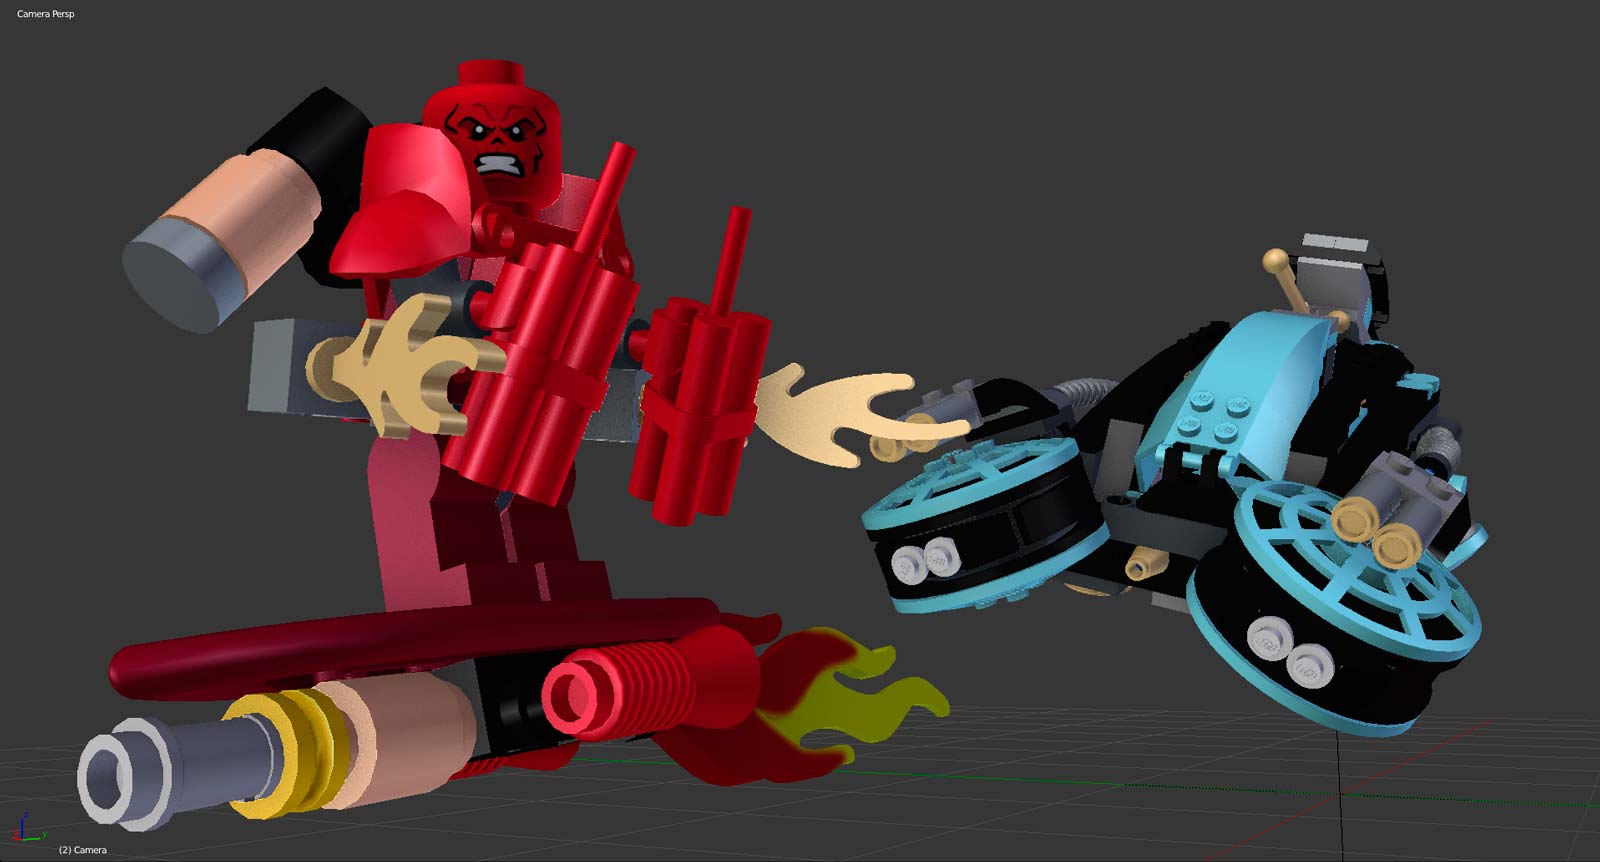
Step4 - Lights
Imagine where you want to put the lights.
Are there any light pieces (headlights, flames ...)? ☀️ 🔥
Where is the sun? Is it day or night? 🌇 🌃
Should I use a light point, an area or a spot light? 🔦
Etc…
Or simply use an HDRi lighting map! 😃
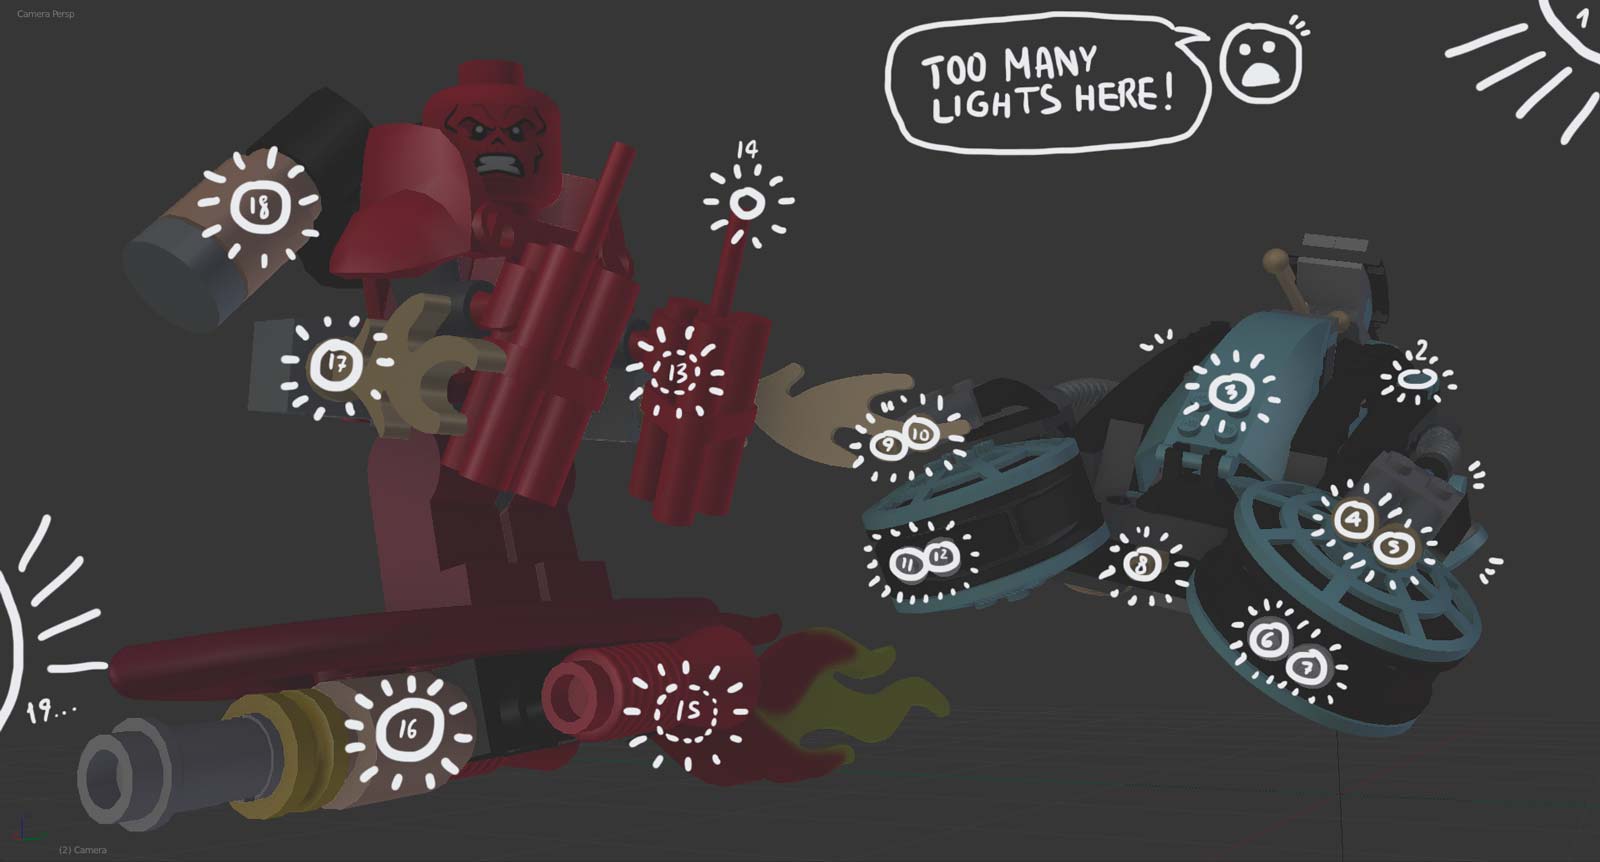
The better way I found to enlight a transparent piece is to put inside it a light point.
Then I select Multiple Importance to make the light source visible.
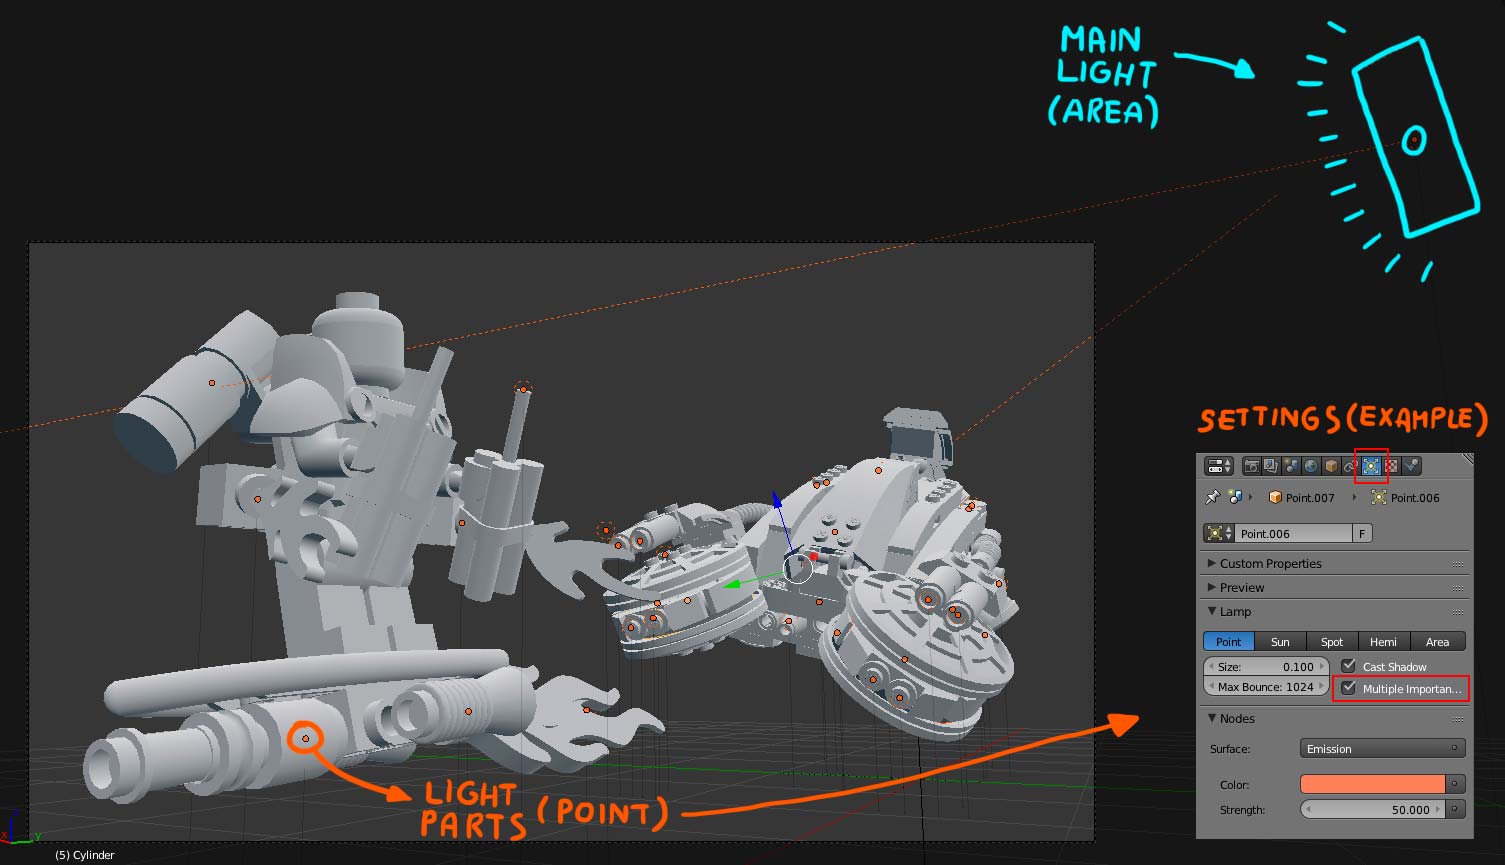
Oh yes, this model is quite complex in terms of luminous pieces! ❇️
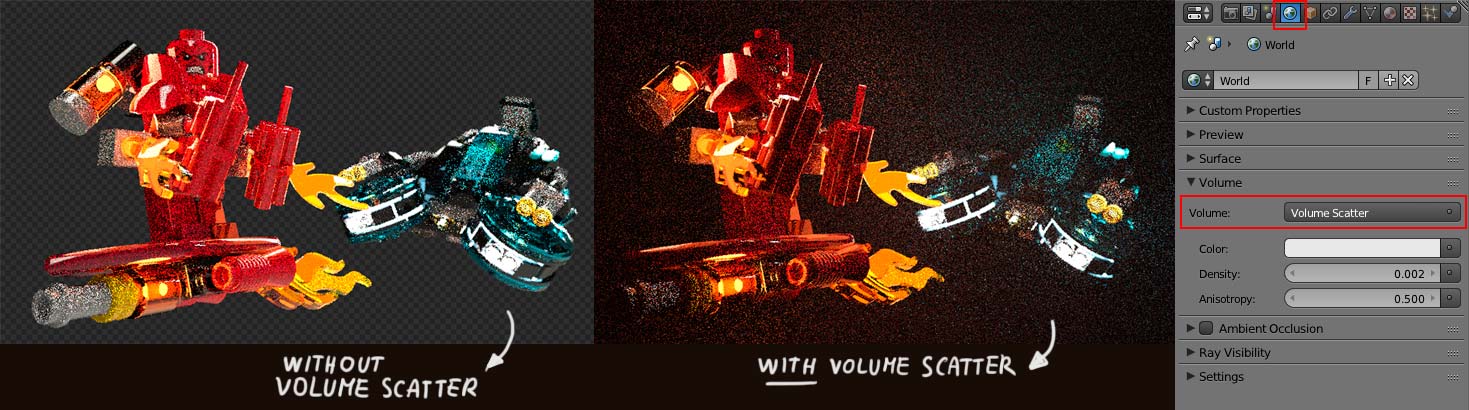
The last option I selected is Volume Scatter because I wanted to recreate a fog effect.
I suggest you this tutorial.
Note: if you use Volume Scatter you can’t use HDRi lighting (at least I think).
I advise you to do a render test in low quality to see if everything is fine.
Hey! Now we are ready… let’s click on the render button and…
… wait…
… wait…
… wait…
… still waiting…
😩
Step 5 - Compositing
Finally our render is finished, hurray! 😍 🎉
Image > Sava As Image (F3) > select where you want to save your image.
Don’t close Blender: we want to add a special touch to lights.
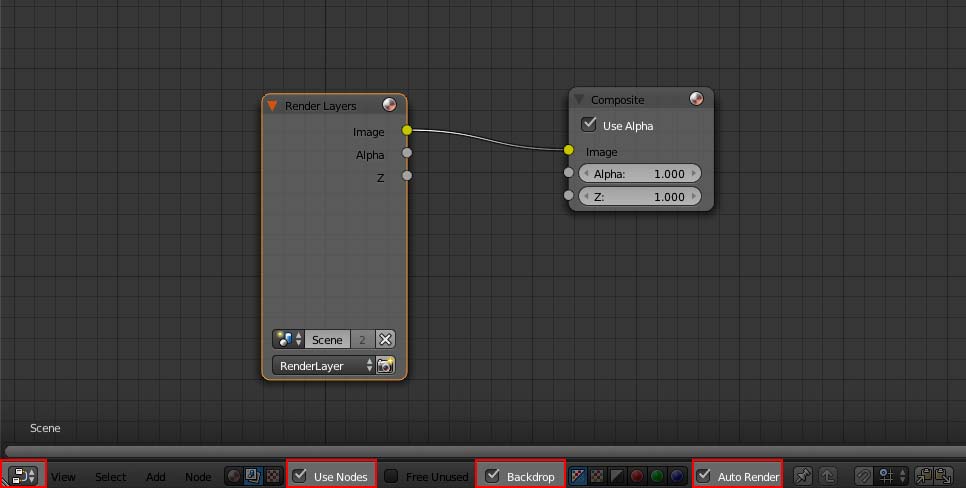
Go to Node Editor and click on Compositing icon.
You will not see anything…
Let’s click on Use Nodes, Backdrop and Auto Render boxes (bottom of the window), now you’ll see only two nodes, Render Layers and Composite. You should add a Viewer node to see your render 😉
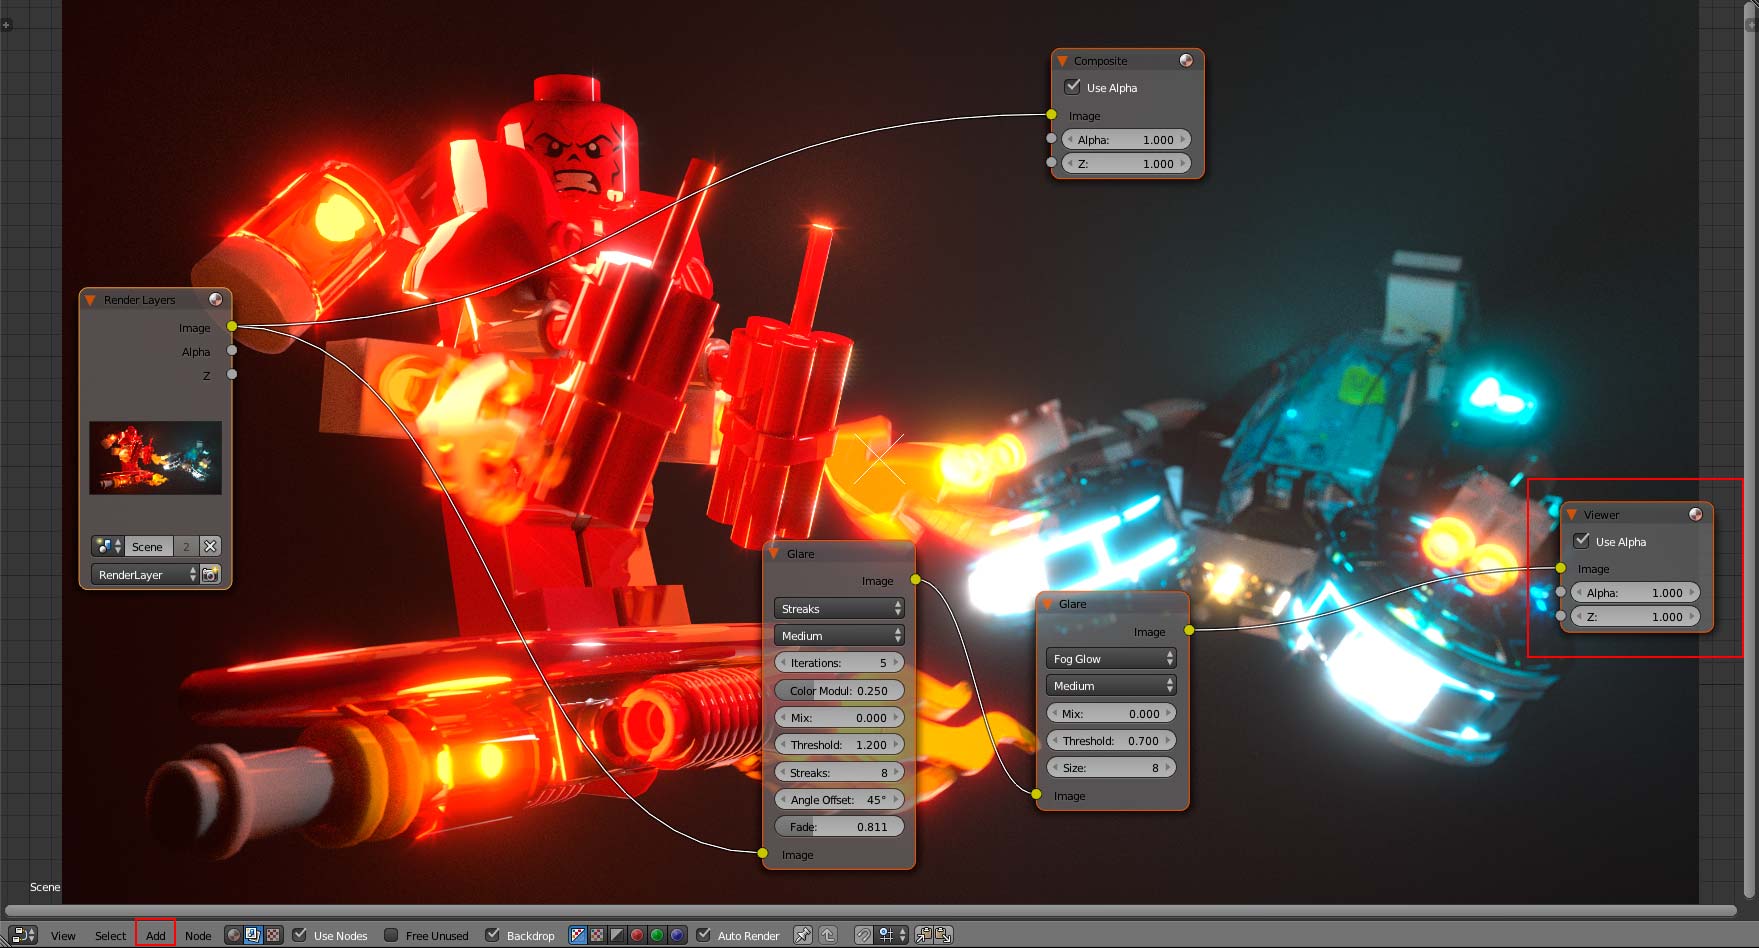
I usually add two Glare nodes, one for Streaks and the other for Fog Glow. There aren’t better or worse settings, just play with them as long as you like the effect.
This time I suggest you to follow this other tutorial.
Now we want to save our image. Go back to UV/Image Editor panel and in the bottom select Viewer Node instead of Render Result. Now again, Image > Save As Image (F3).
Our render is ready to be post-produced.
💻 ✏️
Step 6 - Post-production
I mainly use Photoshop. There are some other free alternatives like Gimp (but I don’t know it very much!). After a render I usually:
• make color correction,
• add filters,
• photo-edit (photomontages).
Another interesting tool for filters is Analog Effex Pro by Google Nik Collection.
If you want to remove some noise, I suggest you Dfine.
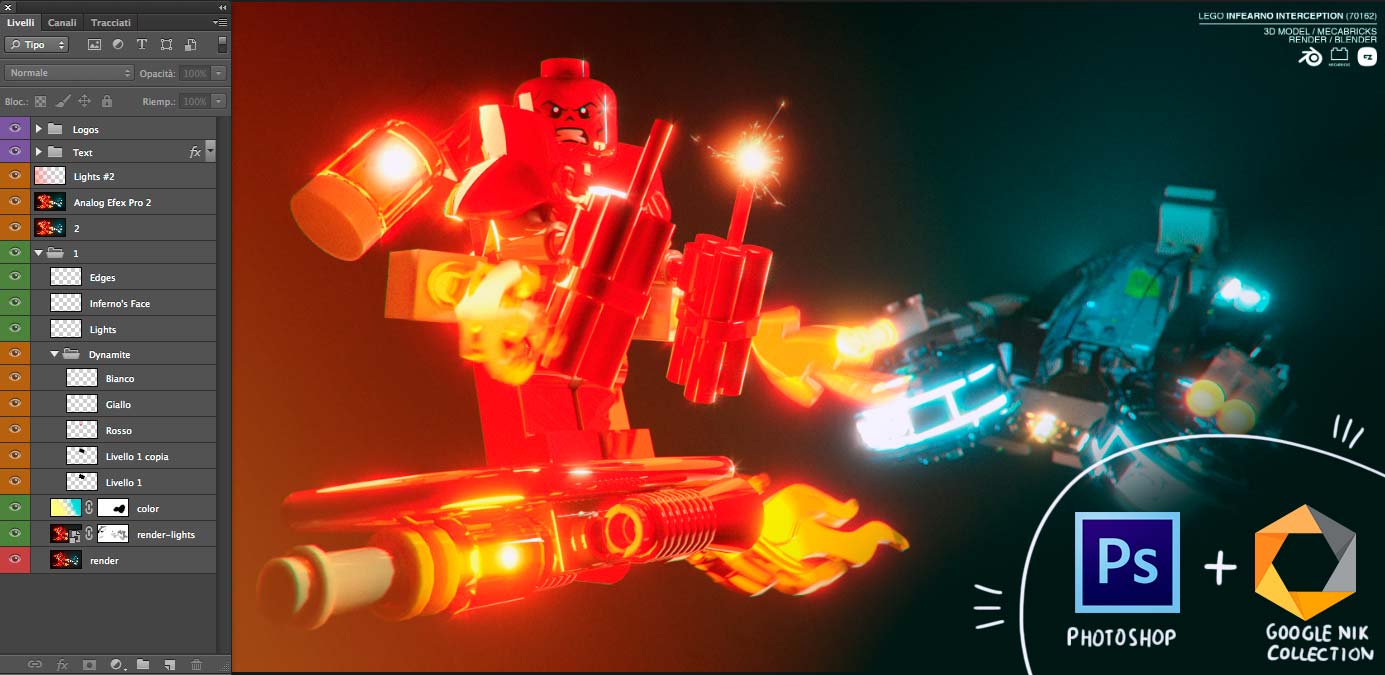
Here I show you the main steps of the post-production:
3) I add some light effects and dynamite’s sparks,
4) other light effects and I correct that little particulars that I don’t like. Then I add the credits.

Ta-dah! (HD here) 🎉 🎉 🎉

I do not know if it was all clear, I hope you found it useful.
I didn’t go into details because it would be a long explanation, but if you have any questions, you can ask me!
Thank for your support Mecabrickers!
😃
Thanks for the tutorial. I will have to try that someday. I also discovered Google Nik Collection. I watched the presentation videos and it looks great. Wondering if it worth $179NZD they are asking for. I'll click the try now button and charge zanna if I decide to get it. Your fault after all lol
Looks great! I was wondering if you weren't using environment lighting… Just curious, how long did that take to render, and how many samples? I totally agree with previous comments -- the volume scatter makes the atmosphere look like some of the scenes from the Lego movie! Great job, and great tutorial.
Scrubs, I know... 100€ are is a lot of money, but the tool offers many possibilities: download the trial version and then decide 😉
Please, don't charge me! Ahahah 💰
RuMontag, after I activated the Volume Scatter option HDRi lighting is useless. You can use it before if you want to start to understand how to direct lights or move the model.
I used 1500 samples for 2880x1620 pixels, TIFF (RGB, 8bit) and it took quite a day.
⏰
Thank you guys! 😃
Yeah, I figured that I wouldn't end up using HDRi. 1500 is about how many I usually do for an extra-nice render. I'm thinking of re-rendering my Classic Space Speeder with some different lighting. Thanks!
Oh yes, I'm very curious! You can also find some inspirations on the web 😉
Great tutorial - thnx! 😃
Thanks you zanna for the tutiral! 😃 I'll try these light things 😄
Thank you guys! I can't wait to see your renderings 😃
I'm glad you find these tutorials useful 😃
oooOoOoH I thought I knew the name when chatting with you zanna..Its because I saw this, nice render dude! Now I want your compositing skillzzz!
LEGO, the LEGO logo, the Minifigure, and the Brick and Knob configurations are trademarks of the LEGO Group of Companies. ©2026 The LEGO Group.
Mecabricks, the Mecabricks logo and all content not covered by The LEGO Group's copyright is, unless otherwise stated, ©2011-2026 Mecabricks.