I had some time today to test out an idea to use a smartphone only to shoot a backplate and a simple HDRI and how this will work with MECABRICKS models.
I haven't checked out yet the different kind of HDR apps.
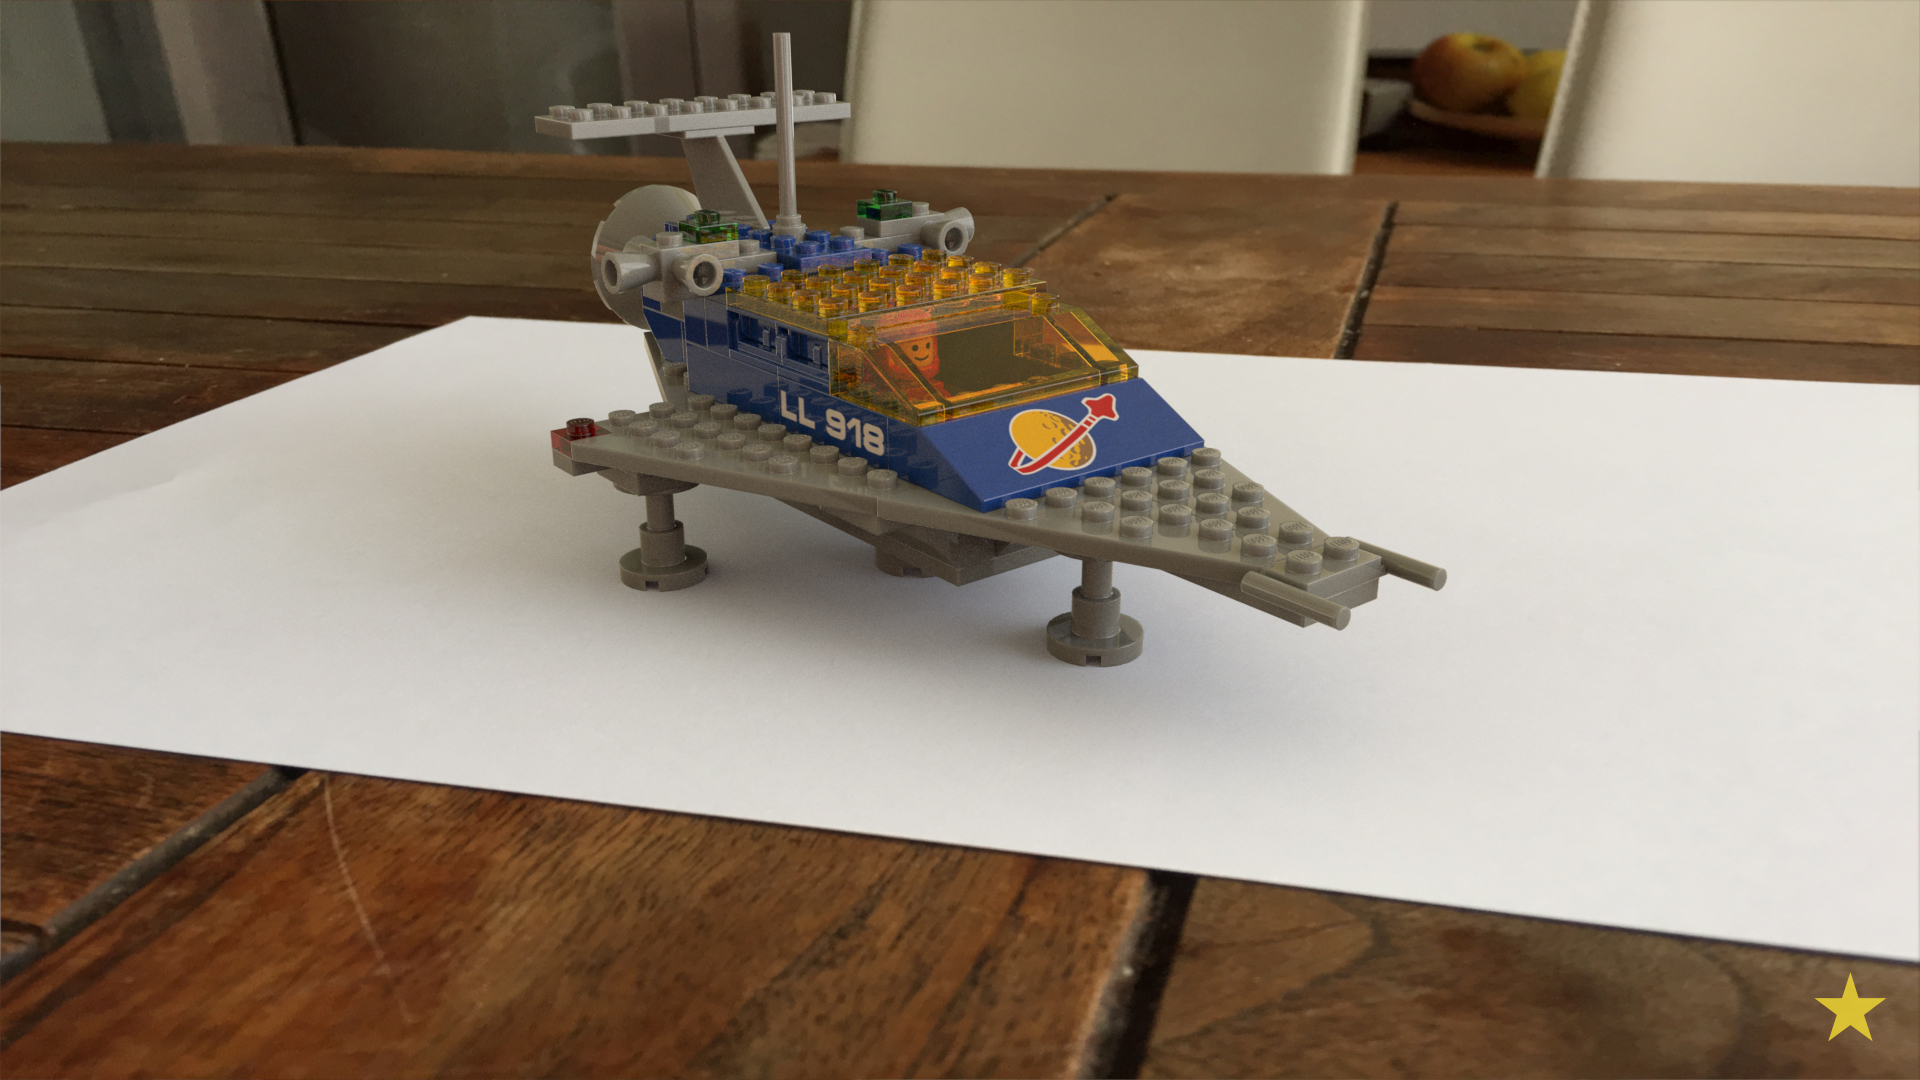
Here's my first result:
What I used:
- iPhone 6 with Pro HDR X app what allows to save three exposures in one shot
- a precision bearing ball with eg. 6 cm diameter
I have bought a long time ago for my company a precision bearing balls with a diameter of 6 cm. You won't find it on the consumer market. Try google for a specialized manufacturer or dealer. The method to shoot a HDRI with a mirror ball is simpler and faster compared to the common method with a fisheye but it's important to have something with a perfect surface. A bearing ball with 6 cm isn't really cheap (I guess I paid something around EUR 100,00) but worth the investment. The fisheye method is of course more flexible and will give you a much better HDR but as you can see in my really quick and dirty test the bearing ball method works like a charm.
Shooting a HDR with a brearing ball and a SLR usually works like that:
- you place the bearing ball on a stand: this could be a cut top part of a PET bottle or in my case just a cap of a milk tetra pack
- you make a centered side shot at a good distance with a telephoto lens and bracketing and another the same at 90 degrees from your first postion
- with Photoshop you can create a HDR of several exposures
- you crop the bearing ball of the result
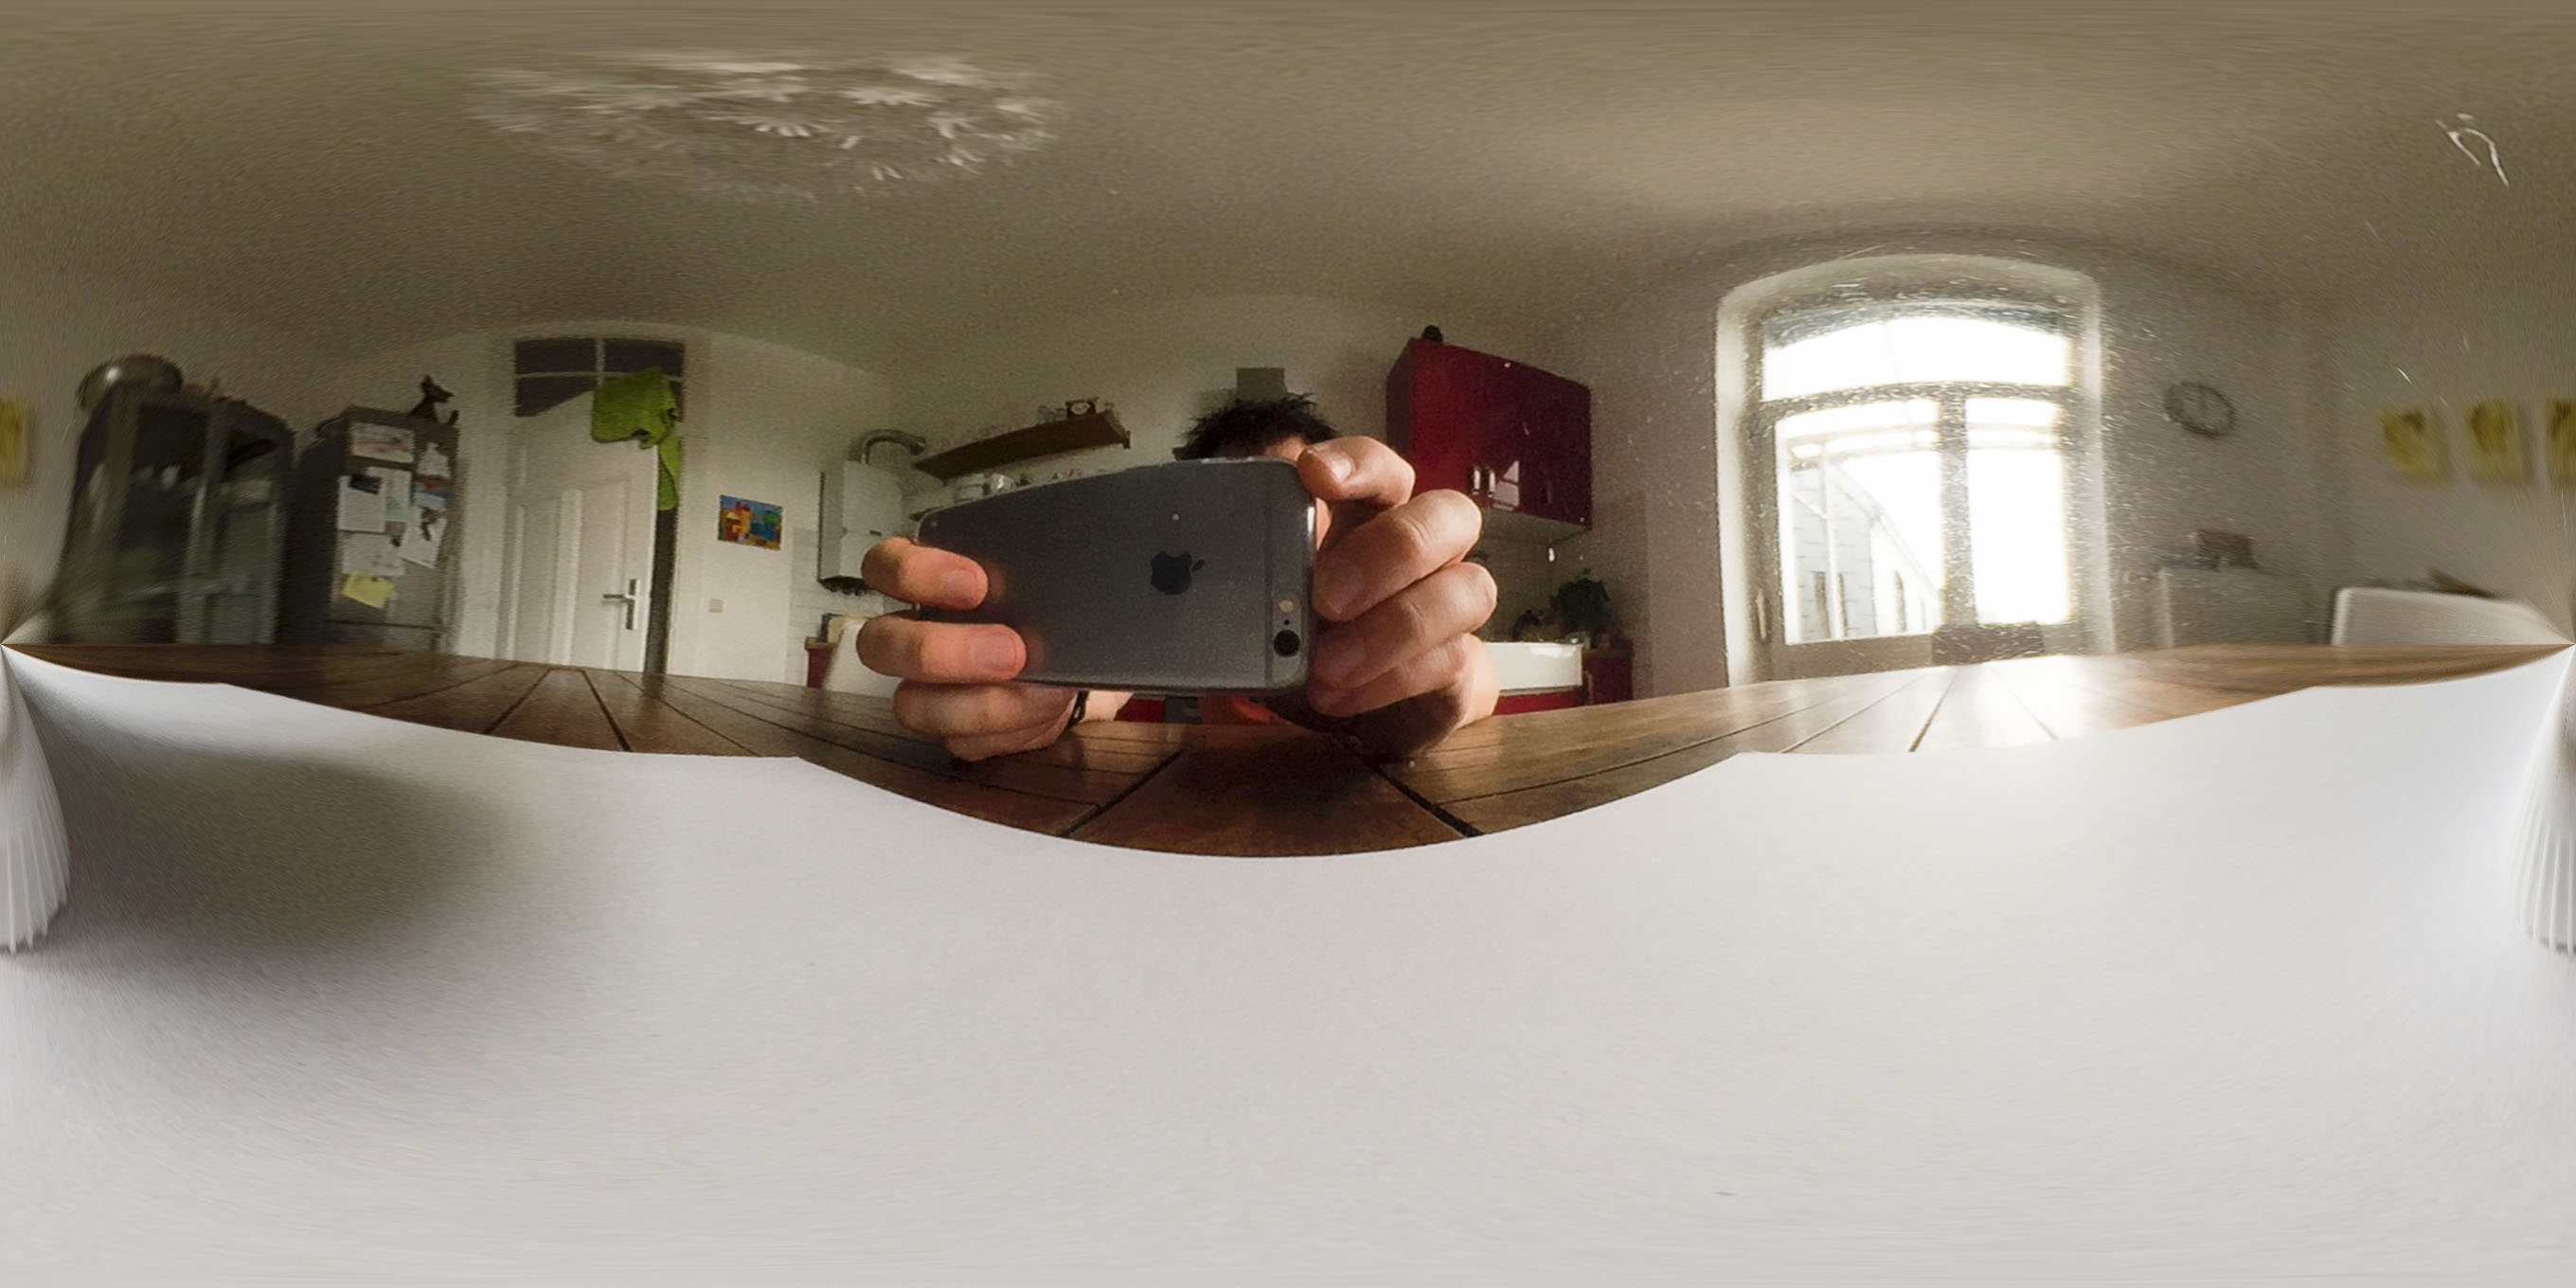
- with a tool like HDR Shop you can convert the mirror balls to latitude/longitude
HDR Shop was free a long time ago. Here you can catch the last free version:
https://drive.google.com/file/d/0B8koCsdBHJPFSGJIb2sxdS1CMDA/edit - in Photoshop you combine both shots to one spherical panorama and save it to a 32-bit format
The reason for two shot is that the mirror ball shot from one side will not catch a complete 360 degree picture of the environment. With two shots you have all the information for a 360 degree full panorama. But you must shoot them from side view.
In my test I tried to shoot two pictures but finally they didn't match and so I decided just to use one and ignore the distortions on the left and right side of the final result because this will be anyway BEHIND my model and the LEGO material has a slightly glossy material.
My test works like this:
- I prepared the place for my model and I used a white page of paper for my test to see the shadows
- I made some reference shots for the look from different angles with a simple LEGO model
- I placed the bearing ball with a cloth glove onto a milk cup in the center of the paper
- I made one HDR shot by hand
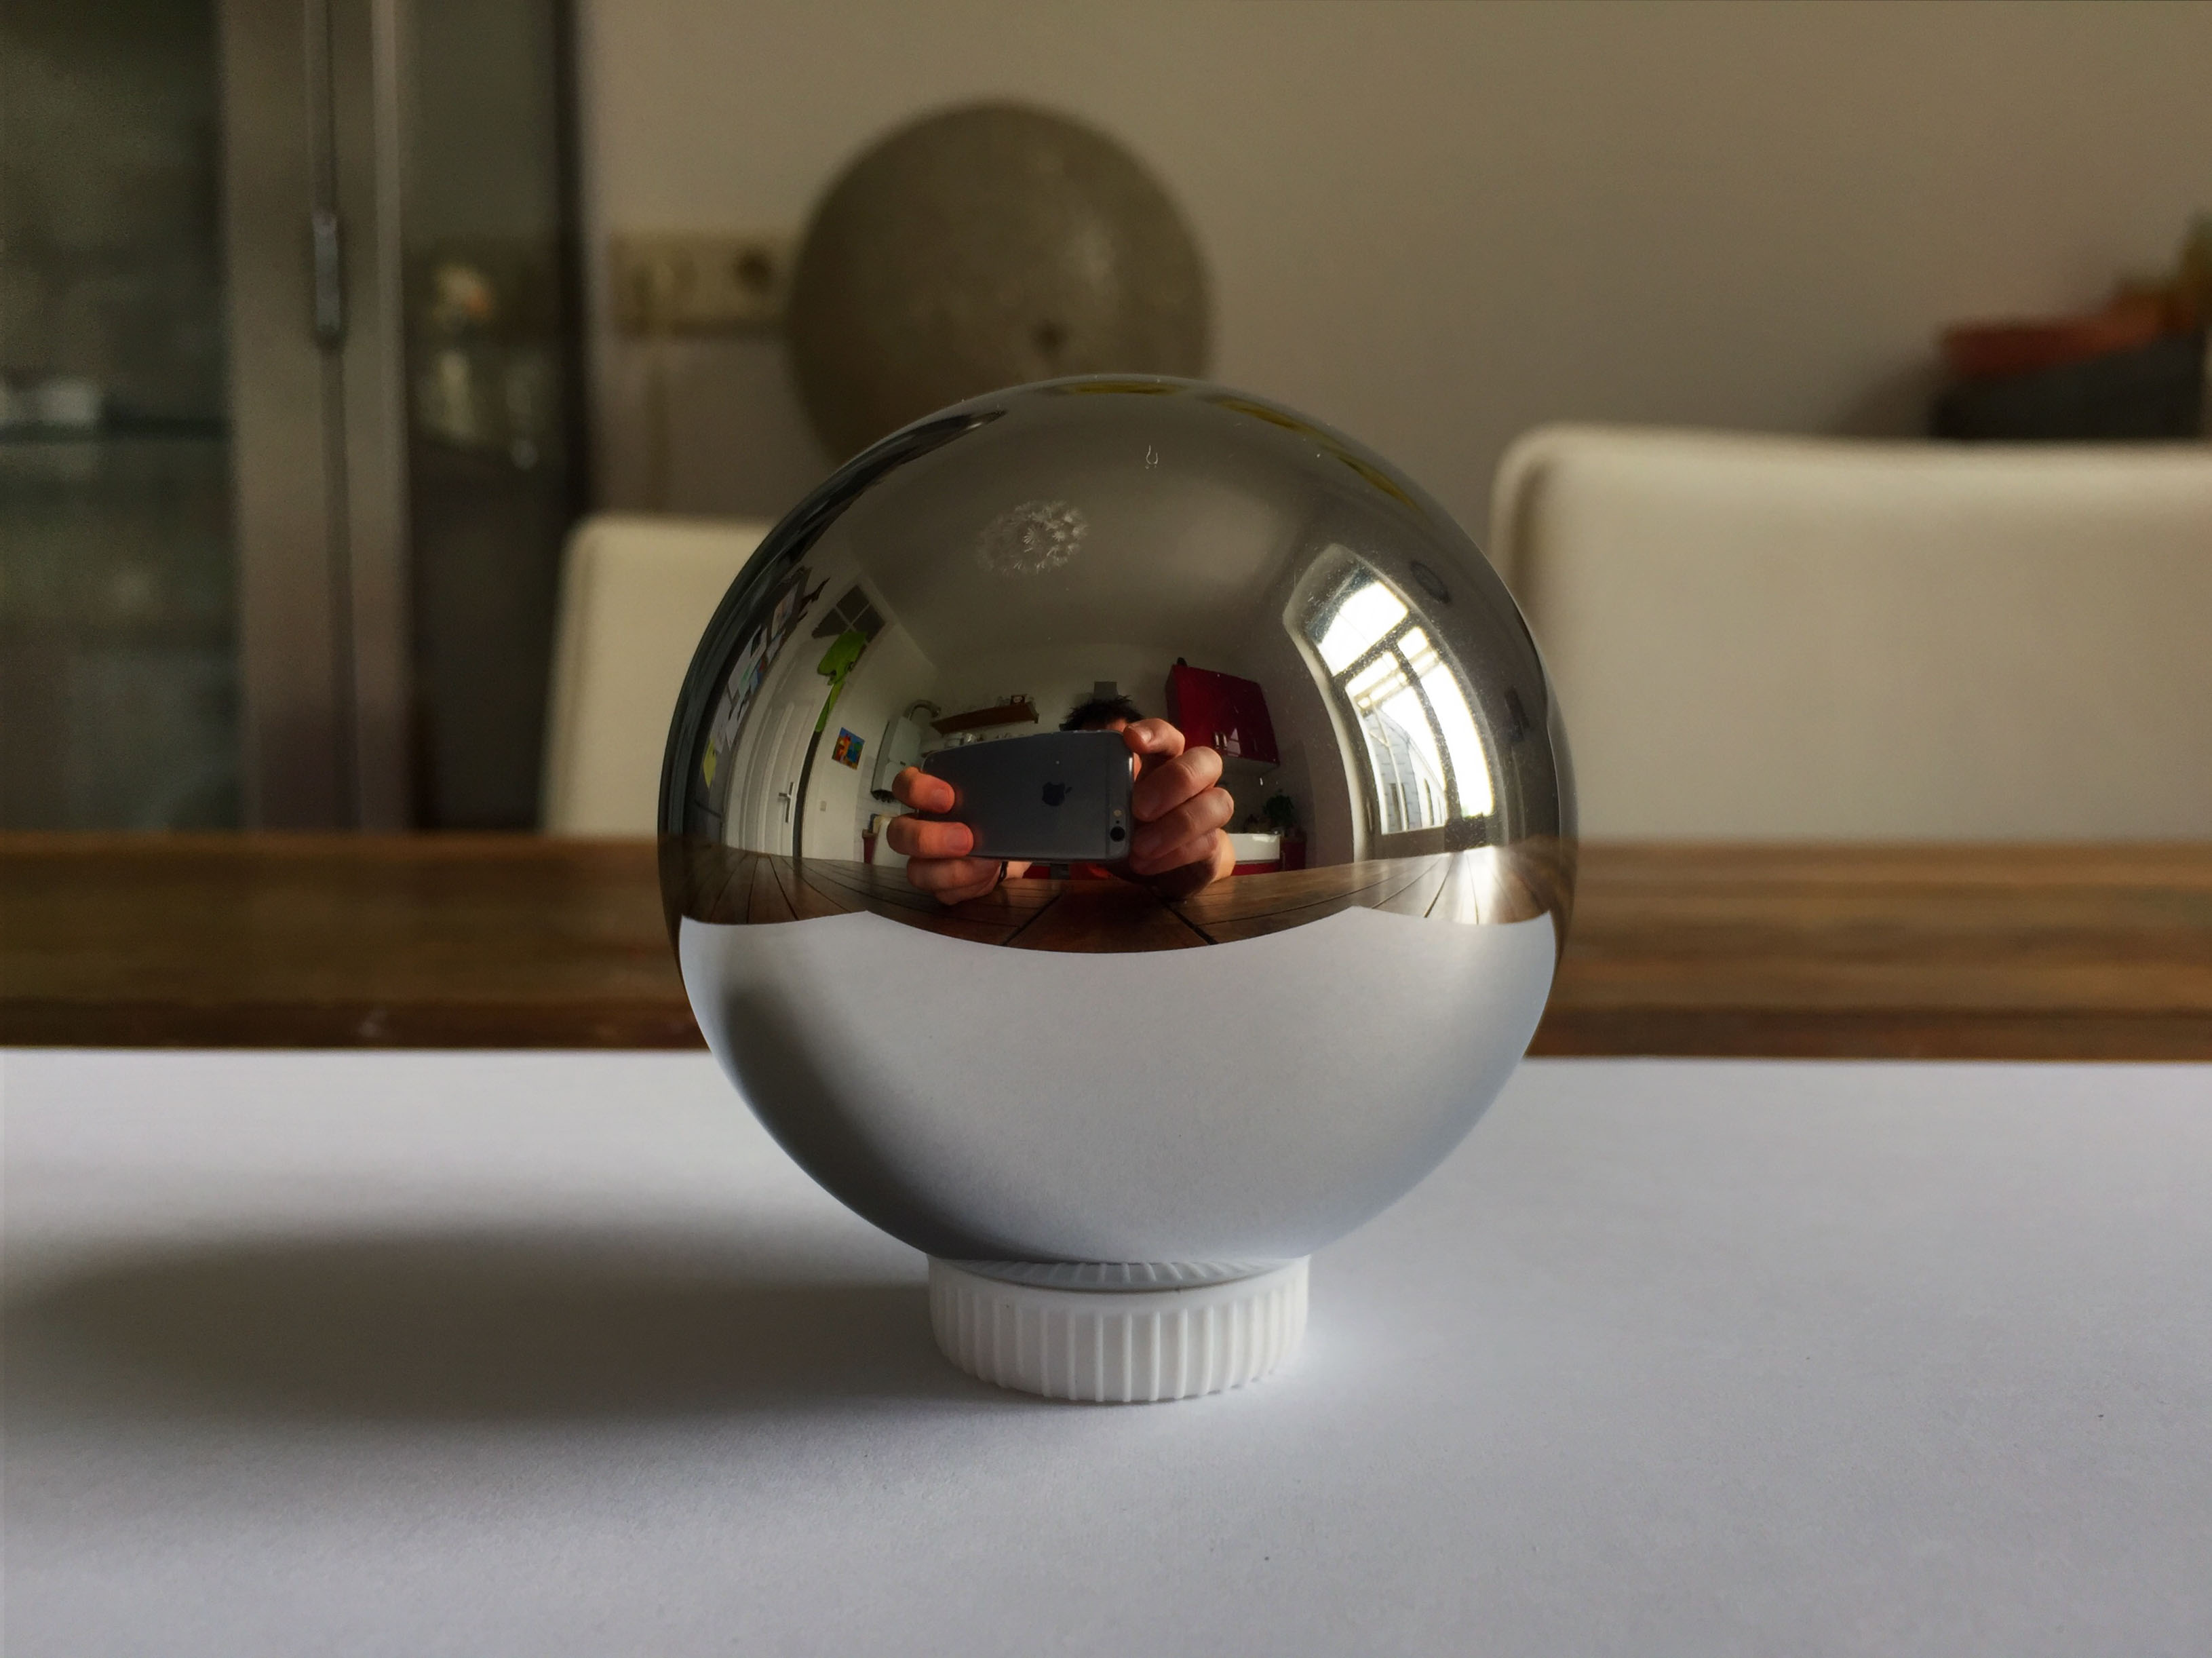
unfortunately the app is not supporting the zoom function of my iPhone to do a distance shot and you'll see me and the iPhone covering a bigger part of the environment reflection. I will check out other apps and build a LEGO stand for my iPhone. - the app will save three pictures in three different exposures: under-exposed, normal, over-exposed (the more pictures you would shoot this way the better the HDR-lighting)
- I shot a few backplates for my rendering
- I shot a movie where I move my iPhone around for a possible future 3d-camera tracking test
- I use Photoshop File>Automate>Merge to HDR Pro... to merge the pictures to a 32-bit HDR.
- I cropped the result to the bearing ball (dang... there's a big piece of hairy dust on the ball!)

- and converted the mirror ball picture into a latitude/longitude result
- I prepared a MODO scene with the model, a grid for the shadow and a second grid for a camera projection of the backplate what gives me the correct floor reflections
- in MODO it's pretty easy to use the backplate as a camera projected environment map just for rendering directly onto the background and turn on "Shadow Catching" for a sparate Shader just for the floor material
- I had to adjust the HDR Environment map to a 5 times higher intensity
- I set the camera focal length to 29 mm according to the iPhone 6 lens
- I adjusted the camera with a reference grid for the paper
- rendering...
Maybe I will record a movie with all steps for a better understanding of the process.
Thanks a lot for this great tutorial. It makes me want to try that now!
I need to find a good size polished ball first.
Genial! I had never thought of using this ball... now I want it! 😮
I will do some experiments with Christmas Tree's balls 😛
The Christmas ball might work but the surface is very bumpy. I would recommend to google for a manufacturer or dealer and contact them. That's what I did. When we do HDR on location for film we use a 8 mm fisheye and a NIKON D800 for that what gives you brilliant and perfect results. But the advantage with a bearing ball is that it doesn't need much space and you can place it nearly everywhere. If you have a SLR or other camera with a tripod and bracketing feature you should give it a try and shoot at least 7 exposures for a much better HDR. But for our purpose the bearing ball with a good smartphone camera might be a nice and simple solution.
The actual method that I use a ground grid with a camera projection of the backplate isn't really perfect because the camera projection will just texture the visible part of the grid what you will see in the reflections especially when it will be mixed with the floor/table information of the HDR because they won't match of course. The spaceship works pretty well but I made a test with the hummer what shows the limitations in the reflections.
The problem is that you can use the environment map for the ground reflections of the table of course but as long as it's a spherical projection it's not really correct and you will recognize this that there's something wrong. To make it perfect you might use a sphere textured with the HDR map and squash the lower hemisphere flat to simulate the floor/table. I will check this out later.
Here you see the result what could be eliminated with the described second 90 degree shot. But honestly: it's not that extreme I thought and not really visible on our LEGO material. Overall it's nearly seemless and it's fascinating that the mirror ball will capture nearly a 360 degree full panorama.

I realized that my first render test on 1920 x 1080 isn't correct because the original iPhone shot is 1920 x 1440.
Right-click to show picture and click on picture to zoom to full resolution:

I am not really happy with some rounded edge results. They are too bright and jaggy. I have to find out how to fix that. Or maybe it's a limitation by the rounded edge shader?!
The other issue is that I have to do some tricks to get a proper shading of the lower parts of the spaceship. As I mentioned I added a grid with a camera projection of the backplate image. The HDR alone will give a nice result from the upper hemisphere but not from the lower hemisphere because you need definitely a floor with this picture information what will be imortant for the shading and the necessary shadow. Otherwise the lower parts of the model will be too bright, reflective and they look wrong because of the distance to the paper and table part of the HDR. Keep in mind that the model is floating in the middle of the HDR sphere and not really standing on the table.
Finally I'll see the HDR reflection mixed with the reflection of the camera projected texture part. This texture is additionally cutted to a shape by a result of the camera projection (all the parts outside the frame are transparent). The grid itself is invisible but visible for reflections, refractions, shadow etc. And it will be affected by the HDR. If you show that grid you will see a darker shaded backplate projection with the shadows of the spaceship. And this is very important for the whole look of the lower spaceship parts but bad because the stenciled grid will be reflected and not fit with the HDR reflections. It looks like that you have to die one death. 😃
For a better result I would have to use a grid of the size of the table textured with additional iPhone shots of the table. This would cover the table and paper of the HDR for reflections. Let's say you filmed a backplate of the room following the spaceship when it's landing onto the table. In this case you have to rebuild the environment with simple models and phototextures for the reflections and shadows (on the table) and use the HDR for lighting or you convert the HDR to a lighting rig.
I guess when I would to a test with my filmed backplate and 3d camera tracking with the actual setup I used for the still we would recognize the visual problems by the camera projected grid.
This is great! Really good to see the results of your tests. And I'm pleased to see you use Modo. 😃
I've been using it since version 102, before it even had a rendering engine. Crazy.
Anyway, you mention the 'bright and jaggy' rounded edges... is this as a result of the export/script from Mecabricks... or the rounded edge option in Modo?
Any chance you can share the HDRI?
LEGO, the LEGO logo, the Minifigure, and the Brick and Knob configurations are trademarks of the LEGO Group of Companies. ©2026 The LEGO Group.
Mecabricks, the Mecabricks logo and all content not covered by The LEGO Group's copyright is, unless otherwise stated, ©2011-2026 Mecabricks.